

Value-Based Pricing for Consultants: 10X Profits Without Working More

Value-based pricing is one of the best ways to increase your income 10X, without working more.

In fact, it’s one of our favorite strategies to grow consulting services and help you earn what you deserve.

Yet, only 17.3% of consultants leverage this pricing strategy!

If you’re looking to grow your business (and charge more), you’re in the right place. In this post, you will learn what value-based pricing is, and how to apply it to your consulting services INSTANTLY.

How Do Most Consultants Price Their Services?

There are 5 popular ways consultants charge for their services.

In a study, we found that most consultants charge either a project-based fee or an hourly rate for their services.

Significantly, only a very small percentage of consultants charge for the value they provide.

Unfortunately, if you’re not charging a value-based fee, you might never be able to grow your consulting business and increase your income.

Project-Based Rate vs. Hourly Rate vs. Value-Based Pricing

Let’s make sure we fully understand the core differences between the three main pricing strategies, and how they stack up against each other.

We’ve worked with agencies who have used all three of these approaches, and while each pricing method has its own merits, we do feel it’s vital that we share our most common objections to each different strategy.

And ultimately, we’re going to show very clearly exactly why we strongly recommend pursuing value-based pricing.

#1: Project-Based Rate

We’ve found that using a project-based rate is the most common pricing strategy. 

And while it can be better than other pricing strategies, it is still limiting – and can easily inhibit your growth. This is because you can’t just 10X your pricing and expect clients to be okay with it.

If you do try this, they’ll be highly likely to just head over to your competitors. Why would they choose your help on a project when they can hire somebody for a fraction of the price, literally?

#2: Hourly Rate

An hourly rate is very limiting since you’re trading your time for money. This means that the more you want to earn, the more hours you need to work, which makes scaling your consulting business a lot more challenging.

Although you can still increase your hourly rate, it’s much more difficult to increase profits.

Ultimately what you’re doing with an hourly rate is presenting yourself to your clients as a cost – rather than as an investment.

#3: Value-Based Pricing

Value-based pricing is getting paid for the value you bring to your clients.

In a nutshell, the whole strategy starts by showing clients what value you can bring to them – how much will their business improve/earn with your help?

You then place a price on your services based on the understood value you will provide.

Source: EduCBA

Here are a few examples of value-based pricing:

  • If you provide $10,000 of value, you can charge $1k – $2k.
  • If you provide $100,000 of value, you can charge $10k – $20k
  • If you provide $1,000,000 of value, you can charge $100k – $200k

And you’ll probably agree that you’d hardly be likely to make $100k charging for a design project by either an hourly rate or with project-based pricing!

How to Apply Value-Based Pricing to Your Services

You may well be sold on the whole “value-based pricing” strategy in principle.

But how will you actually put it into practice with your consulting services? We’ve compiled our best step-by-step strategy to achieve this – and apply it to your business instantly.

#1: Create an Ideal Target Persona (And Stick To It!)

You can’t please everyone with a value-based pricing strategy.

Instead, you should create a specific segment of the audience (A.K.A. a target persona), and focus your efforts on that.

For instance, if you offer design services, you can focus on:

  • UI/UX design
  • SaaS design
  • Landing page design
  • Facebook Ad design

It’s important to have a specific segment of the target audience in mind and tailor your services and value to them. 

Of course, your consulting services can target multiple segments.

But if you have multiple segments, you must determine a suitable value-based price for each one of them.

#2: See How You Stack Up Against The Competitors

Your next task is to figure out who your biggest competitors are. There are a lot of ways to do this, including:

  1. Market research
  2. Customer feedback
  3. Social media groups

Or you can just type into Google “your niche + consulting services + your location.” 

After that, it’s time to make a comparison. This is important because it will allow you to see how others price their services – and give you a rough idea of what to charge.

Note: For products that are truly new, without peers, the value-based pricing won’t work as well.

#3: Figure Out the Differentiator

You should now have a good understanding of what makes your consulting services unique from competitors.

Your next task is to create a list of unique services/perks you offer.

Source: Pipedrive

This is also called a USP – a unique selling proposition.

#4: Charge EXTRA for the Differentiators

The last step is calculating a value-based price for the differentiating features/perks.

Your job is to figure out how much value these will bring to your potential clients – and adjust your pricing accordingly. 

To accomplish this step, marketers typically use research methods such as:

  • Conjoint analysis
  • Qualitative customer interviewing

Make sure to take your time on this step – it can make or break your pricing strategy.

Value-Based Pricing Is a Win-Win for Both Parties

The first time you start charging by the value you provide, you’ll simply think that it’s a way to charge more for your services. 

But the truth is, it changes the whole dynamic of your business…

Instead of being seen as a cost or liability, you will become a valuable investment to your clients (which will help you with client retention!)

Source: Quickbooks

You will also structure your engagements to create value rather than deliver services. 

When done properly, everybody wins, and higher fees are just a consequence of putting your focus on the client and the question of how you can create more value.

Still Hesitant?

If you’re still in any doubt about the value of value-based pricing, consider having this kind of conversation with a potential client…

  1. You begin by asking lots of questions about the business, getting the client to work out the increased return on their investment in you. Take the time to go through this step by step, not telling the client what the ROI will be – but getting them to work that out themselves by answering your questions.
  2. Once the ROI has been calculated and accepted, ask the client if a 5X ROI would sound good to them. They’re almost certainly going to agree that it would! (And in the unlikely situation that they say no, ask them where else within their business/agency they’re currently seeing a 5X return on investment – they won’t be able to, of course!)
  3. Now you’ve got an agreed ROI, and an agreed ratio of 5X, you can agree on the price you charge.

    So if the company will see an increased return of $100,000 by investing in you, you can provide them with a 5X ROI by charging $20,000.

    And if they calculate and agree that they’ll be likely to see an increased revenue of $500,000, you have a very easy opportunity to get them to agree to a price of $100,000 for your services – quite impossible through any hourly rate!

Start Charging for Your Consulting Services the Right Way

Value-based pricing is a fantastic way to maximize profitability without trading your time for money – or doing any EXTRA work. It’s a win-win for both parties – and the fastest way to grow your consulting business.

Looking to provide even more value and grow FASTER? That’s exactly what our tool can help you achieve! 

Atarim can help you organize work in seconds and add tasks with urgency and deadlines, so you know precisely what to work on. You can leverage point-and-click collaboration to allow clients to point at what they’re referring to and immediately leave feedback, say what needs to be changed, and so much more. 

We have already helped 13,000+ agencies cut delivery times down to weeks instead of months.

If you want to organize your work, finish projects faster, and deliver more value, give Atarim a shot for FREE now.

  • Integrated into the leading visual collaboration platform trusted by 13,000+ agencies (web dev, design, and beyond) worldwide.
  • Supporting project delivery for 1,200,000+ of their clients and stakeholders.
  • Deliver projects in weeks instead of months.

The 8 Best Design & Creative Approval Software to Use in 2024

You’ve made it! After much hard work, you’re finally at the last stages of your design project – and now just need reviews and approval from your clients and stakeholders. This should be an effortless and quick process.

However, from our years of experience, this is rarely the case.

If you don’t have a clear review and approval workflow this stage can easily take weeks, or even months.

From endless email threads, to clients looking at completely the wrong design version, there are so many bottlenecks – none of which are strangers to most creative agencies.

But there is hope.

By taking advantage of the right tools, many agencies have already discovered that it is possible to remove these common bottlenecks, helping to deliver projects faster, and cutting turnaround times from weeks to months.

In this post we’re sharing our eight best design approval software solutions to help you prevent these problems, and deliver projects quicker and with far less hassle.

Say goodbye to stress and wasted time, and hello to a more profitable future!

#1: Atarim – The Best All-In-One Solution for Design Teams

Atarim homepage

Yes, this is us! But as a design agency ourselves, we built Atarim as the solution we desperately needed. We understand your pain points, because we had them too! That’s why we sat down to design the perfect solution, which has since grown to become one of the most popular tools available, used by thousands of design agencies.

Atarim is an all-in-one collaboration platform for design teams, agencies, and enterprises.

It offers a robust set of features that will allow you to cut the delivery time by half, and boost design approval time by 300%.

Atarim improve time in design approval review

One of the key features of Atarim is having the ability to collaborate with clients in real time. You can leave comments directly on the design itself, and take advantage of a range of quick and simple markup tools. 

Atarim point and click collaboration in real time

Unlike other tools, we allow you to turn clients’ comments into tasks, complete with deadlines.

You can also track time on each task, monitor the overall effectiveness with in-depth analytics, and keep everything organized and on time. The built-in version system lets you maintain an easy-to-navigate record of all previous versions of a design, ensuring everyone can see the progress over time.

Atarim dashboard

Are you already comfortable using existing agency tools for communication, such as Zapier, Slack, Monday, etc.?

If so, then you’ll be pleased to know that Atarim provides full integration with all of these platforms, as well as nearly a dozen more. No need to completely change the established processes your agency enjoys – just plug Atarim in, and enjoy the benefits.

But the great thing is – your clients will think you’re using Atarim for their benefit! Because Atarim makes it so much quicker, easier, and simpler for clients to provide feedback, they’ll see it as a win for them, not realizing that it’s helping you turn projects around faster, (and therefore increasing your profit!)

We offer a FREE forever plan, or paid plans supporting additional functionality, such as user permissions, dedicated success manager and team training, as well as a full white-label experience, starting at $25 a month.

Atarim pricing

#2: ProofHub – The Most Customizable Solution

ProofHub homepage

ProofHub is a project management and team collaboration platform – much more than just a dedicated project approval solution. It’s ideal for non-technical users since it’s super user-friendly and intuitive – unlike many other solutions.

It supports the most common graphics file formats, including JPG, PNG, and PDF, and includes a range of markup tools to help make it clear what’s needed. ProofHub also includes versioning control, to help keep track of progress over time, and the changes introduced at each iteration.

Communication is also well managed, allowing internal discussions between team members directly linked to tasks, and with inline responses to keep the conversation organized.

ProofHub homepage

ProofHub also allows you to create custom workflows, which are super-handy for tracking how tasks progress – keeping everyone on the same page throughout the project. For instance, here is an example of a content management workflow:

ProofHub workflows

As you can see, each step is well mapped and documented. This will make it easier for your team to finish projects, deliver them quicker, and ensure the top quality.

To make it even more effective, you can also use project templates.

ProofHub project templates

These will save you tons of time since you won’t have to get started on new projects from scratch, filling in the basic details, and setting up workflows. You have an option to add a tasklist, discussion topics, timesheets, and notes.

And if there’s something you don’t like (or can’t get used to), you can customize it – no matter whether it’s the UI, workflow, or project settings.

You can also define clear roles, and set permissions for different users. This is great for security reasons, and also for showing your team members or clients only what they need to see – keeping all internal documents “internal”.

ProofHub also offers a mobile app to help you manage projects on the go.

When it comes to cost, ProofHub has split its pricing structure into two flat fee-based plans, starting at $45 a month.

ProofHub pricing

#3: GoVisually – The Best Dedicated Approval Software Solution

GoVisually homepage

GoVisually is the world’s top-rated proofing and design approval tool.

It’s super-useful for design agencies dealing with different types of design work, whether it’s a standard design, PDFs, or even videos.

As a designer, you often create multiple versions of the same design. GoVisually allows you to compare different versions of a design side by side. This is a great way of showing the client exactly what has been changed, and how, helping them to decide on the best way forwards.

GoVIsually comparing two design variations

You can also collaborate in real time on any additional changes with both your team and clients. Plus, it also offers dedicated client review portals that provide a personalized experience. This makes the whole approval process more enjoyable while also reinforcing professionalism and strengthening client relationships.

To make the collaboration even more effortless, GoVisually also allows you to share work-in-progress directly from Adobe Creative Cloud. That’s right, you can update proofs and revisions in GoVisually without ever having to leave Adobe Creative Cloud.

GoVisually share directly to Adobe creative

Say goodbye to messy screenshots & endless email threads. GoVisually puts all your projects, reviews, and approvals in one place, eliminating any confusion and friction caused by switching between tools.

And in case they don’t support your favorite tool, one of their integrations definitely will. You can connect to over 3000+ apps using Zapier. This will help you automatically move information back and forth between GoVisually and thousands of popular apps.

GoVisually offers a simple pricing structure consisting of two pricing plans on a per-user, per-month basis, starting at $60 a month.

GoVisually pricing

#4: Ziflow – The Best ‘Hand-Off’ Approval Software

Ziflow homepage

Ziflow is a great design approval software if you’re looking for the highest efficiency, since it’s built for automating the whole workflow. It also supports over 1,200 media types. In this way, you can quickly capture and review feedback on multiple file types within one powerful platform.

There is also a high level of security and compliance. 

For instance, you can add digital fingerprints to your creative asset workflow, protecting your brand, your team, and your clients. 

Ziflow digital signature

You can also easily generate audit reports at any time. Ziflow saves and aggregates creative asset feedback instantly for compliance auditing. With a simple click, access and export every action taken on a creative asset from start to finish.

Ziflow audit reports

Ziflow also allows you to create compliance specific automated workflows by forcing the inclusion of required decision-makers. This is critical to protect you from penalties from legal issues – and the costs of hurting your brand credibility.

Ziflow compliance specific automated workflows

You will also get a detailed activity of each asset’s comments, and decisions, as well as which notifications were sent, and when. This allows you to catch up with your team on the project’s progress, and see who worked on the project.

Ziflow activity log

And if you miss any functionality, you can integrate it with your favorite tools, including:

  • Slack
  • Teams
  • Photoshop
  • Google Drive

Since Ziflow is all about automation and efficiency, you can also track your performance. It provides detailed reporting and analytics on the approval process. You can track the progress of designs, approval times, and identify any bottlenecks.

Ziflow offers one free and two paid plans, starting at $20/user/month.

Ziflow pricing

#5: Filestage – The Best Approval Software for More Than Design

Filestage homepage

Filestage is the content review platform that makes approvals clearer, faster, and more collaborative. In fact, most of their users are able to cut feedback and approval times by 30% – signing off 92% of files in just two review rounds.

Since it’s a content review platform, it focuses on more than just design, including:

  • Websites and UX design. Make feedback easy and intuitive for your clients instead of sharing designs with complex UX tools.
  • Videos and commercials. Tap anywhere to pause videos and add comments and annotations, giving creators full context.
  • Social media posts. Review content calendars and assets in one place so you can always find the files you need.
  • Documentations. Review and collaborate on contracts, company manuals, and other important documents.
  • Email and CRM. Share email sequences and campaigns to make feedback easier and more visual.

Filestage also provides a great user experience for both your team and clients.

It offers a user-friendly and intuitive interface, making it easy for internal teams to navigate and use the platform without extensive training or technical knowledge. Plus, there is no need to create an account for your clients – which is a huge plus.

(Since we know most clients absolutely hate having to do this!)

You also get a full white-label experience to make you look more professional. That’s right, Filestage offers customizable branding options, allowing you to present the platform to clients and stakeholders under your own brand identity.

You can also integrate it with all popular project management tools, which is enormously helpful for making your team more productive. Simply upload a file to your cloud drive, create a project in Filestage, assign review tasks in Asana, and send nudges for feedback in Slack. 

All of that without lifting a finger!

Filestage integrations

The Filestage pricing plans start at $19 a month, and follows a per-user, per-month model.

Filestage pricing

#6: Aproove – The Best Approval Software for Large Enterprises 

Aproove homepage

Aproove is a design review and approval tool for larger companies and enterprises.

One of our favorite features of Aproove is its user-friendly dashboard. It allows you to see project progression, while also automatically flagging at-risk or late proofs. This helps you prioritize and minimize any delays that slow down the progress.

You also get great version control and comparison views.

In fact, Aproove will automatically detect and highlight any changes between the proof versions in their comparison views. This helps stakeholders easily identify modifications and iterations, streamlining the approval process.

Aproove highlighting changes

Your clients and team members can also collaborate in real-time, leave comments, annotations, and mark changes directly on the design files. 

Also, Aproove prioritizes data security and confidentiality. It employs advanced encryption and secure cloud hosting to protect sensitive design assets and information. This prevents any data leaks that might lead to legal issues.

Also, Aproove provides pre-built reports that can track and analyze the health and performance of projects, and identify any bottlenecks in your process. You can track various KPIs and compare the current project’s performance with the previous ones. This will help you stay on top of your game and maximize your effectiveness.

They offer two paid plans for small and medium businesses and enterprises, starting at $750/month.

Aproove pricing

#7: ReviewStudio – The Best For Review & Approval Presentation

ReviewStudio Homepage

ReviewStudio is an online proofing and collaboration tool for photo studios, advertising agencies, educational institutions, and even restaurant chains. It offers intuitive features to automate workflow, and remove unnecessary manual loads.

It also provides excellent markup tools to give quick and accurate feedback, including: 

  • Shape choices
  • Sticky notes
  • Freehand
  • Pen
ReviewStudio markup tools

Right after you make changes, you can present them LIVE, along with your reviews, to either your team or clients using Review Studio’s presentation mode.

They also provide a seamless experience for collaborators. ReviewStudio offers easy guest access for clients and key decision makers – no downloads or updates required. Also, since it’s a cloud-based solution, everyone works in the same space, on the same file, eliminating the need for endless email chains.

ReviewStudio seamless collaboration

For guests and reviewers, as little as just a few minutes is usually all it takes to become familiar with ReviewStudio’s review and approval tools.

To keep the work moving forward you can also set deadlines and reminders.

You can use automated workflows to keep your feedback, tasks, and revisions on track. ReviewStudio allows you to see a complete history of all approval decisions, as well as tasks and feedback. This makes it super-easy to understand how and why a decision was made.

ReviewStudio automated workflow

If you don’t find a feature you need, then Review Studio offers robust API and Zapier integrations to seamlessly integrate over 2000+ applications. 

They have split their pricing structure into five straightforward pricing plans, starting at $24 a month.

ReviewStudio pricing

#8: GoProof – The Best Approval Software for Adobe Creative Cloud Users

GoProof homepage

GoProof specializes in providing proofing and collaboration tools specifically designed for creative content, including designs, artwork, and marketing materials – and they have tailored the entire tool for this specific purpose. 

GoProof file types

For instance, it seamlessly integrates with Adobe Creative Cloud. This allows designers to send design proofs directly from Adobe applications such as Photoshop, Illustrator, and InDesign for review and approval.

Plus, collaborators don’t need a copy of Adobe Creative Cloud to proof work. 

A hi-res image version of your document is presented to them through their encrypted website, so you can invite as many collaborators as you want.

That’s why it works so well: you use Adobe CC – they use a browser.

GoProof also supports customizable proofing stages and workflows. This ensures that designs progress through the appropriate review and approval stages based on the project’s requirements. 

GoProof proofing stages

It also has a mobile app, with the option to send you notifications of any comments or approvals.

And in case you’re looking to monitor your performance over time, GoProof provides a comprehensive insights reporting dashboard. This will help you quote more accurately, avoid scope creep, and maximize your effectiveness.

With GoProof you also have an option to track workload on each of your designers. Key performance data shown up by Insights gives a true feel for the strain and effort your designers are under, and helps you manage their workload more effectively.

The pricing is based on the number of users and their specific roles. They don’t offer any free plans, with the paid membership starting at $1,500 per year. You can also hop on their free trials and product demos upon request.

After Action Report – Cut Your Project Approval Time And Maximize Client Satisfaction

Project review and approval should be an effortless task you look forward to. Yet, most agencies don’t view it this way. This is mostly because they don’t have a clear process of project review and approval. If this is you, this process is probably chaotic and leads to a lot of bottlenecks.

Fortunately, you can fix all of this, deliver projects much more efficiently, and slash the delivery time by using review and project approval software. And that’s what our team will help you with!

Atarim can help you review and approve projects in no time. We allow you to collaborate with clients in real time, turn comments into tasks, and keep the whole workflow straightforward – automating any repetitive tasks.

With our in-depth reporting and time-tracking feature, you can see how well your project is progressing and fix any potential issues before they become major problems.

If you want to eliminate all issues with the design review and approval process give Atarim a shot for free now.

  • Integrated into the leading visual collaboration platform trusted by 13,000+ agencies (web dev, design, and beyond) worldwide.
  • Supporting project delivery for 1,200,000+ of their clients and stakeholders.
  • Deliver projects in weeks instead of months.
The 6 Stages of Project Management: How to Manage Projects Like a PRO

The right project management process is a vital part of every successful project – yet, many companies still don’t know how to manage their projects properly. This failure inevitably leads to a massive loss in revenue and often missing deadlines.

Projects running out of resources

Source: Monday

Fortunately, project management isn’t difficult. And if you know what you’re doing, it can be an exciting part of your job – which you can even learn to enjoy!

In this post, you will learn our bulletproof six-step project management process. This is the process that helped us and our clients create winning projects that have delivered the promised results, whilst never running out of resources (or time!).

#1: Project Initiation

The first stage of every successful project management process is getting as clear a picture as possible of what you’re working towards.

You can divide this stage into two smaller steps.

  1. Define Project Goals

It’s essential that you, your team, and your client are clear on your goals.

In fact, being unclear on the main goals and objectives is the reason why more than one in three projects fails.

lack of clear goals leads to project failure

Source: Gitnux

To make your next project a success, you need to set SMART goals.

SMART goals are super-specific, have a deadline, and have a clear way to measure them. By using these, you can continually monitor whether you’re on the right track.

SMART goals formula

Source: WorkTango

Here is an example of SMART goals:

smart goals example

Source: Office Timeline

Make sure to set these goals for your project and review them with your clients and team. There is nothing worse than striving for an unrealistic goal.

  1. Complete the Project Charter

The project charter is a document consisting of details such as the project constraints, goals, appointment of the project manager, budget, expected timeline, etc.

You can see an example of a project charter below.

project charter example

Source: ProProfs Project

Also, a project charter states that a project exists – and provides managers with the authority to begin work.

#2: Project Planning

This stage is all about setting out the timeline for the overall project so that you know when you will have the capacity for more work. The best approach is to be as transparent as possible, and define your delivery estimates at the start. 

Before you begin the project, you should know:

  • What tools will be required
  • What resources will be allocated/needed
  • What content or deliverables you’ll need from the client

Set a Budget Estimate for the Project

Running over budget isn’t unusual for projects. In fact, almost one in three projects runs over the budget – which causes delays and looks unprofessional. That’s why it’s essential to allocate the right amount of time and money to cover the whole project – as well as any unexpected things/situations that may occur.

It may be difficult to estimate at first – but it will come with experience.

Also, if you want to create better time estimations for your projects, you can take advantage of Atarim’s timers.

time tracking Atarim

It’s as easy as creating a timer for each of your tasks, and tracking time by starting/pausing the timer as you (or any team member) works on that task.

tracking time for each team member Atarim

By using these timers, you’ll know precisely how long each task took, for each of your team members – allowing you to create better time estimates in future, as well as being completely transparent to clients, and billing accurately.

Define Roles and Responsibilities 

Establishing clear roles and responsibilities is critical if you want to manage your projects properly without any major issues.

It’s one of the biggest challenges for project management, especially when you’ve hired new members and your team isn’t aligned. If you don’t establish clear responsibilities, it can lead to wasted efforts, and result in serious production bottlenecks – especially if two people on the team end up doing the same task. 

If there’s confusion, you’ll end up losing time having to explain these things. 

#3: Project Execution

Finally, it’s time to execute the project and create something awesome.

This is the stage where your team does the actual work. As a project manager, your job is to establish efficient workflows and carefully monitor the progress of your team.

Allocate & Manage Project Resources

Allocating and managing resources throughout the execution of your project is essential for keeping everything running smoothly.

And that’s precisely what Atarim can help you with!

Atarim will allow you to organize your projects into tasks that you can assign to your team members.

organize tasks inside Atarim

You can also view the activity of each of your team members.

full team activity Atarim

Atarim makes it easy to track the exact amount of time spent by each team member on each individual task, or the project as a whole. This massively improves your ability to be transparent when reporting to the client, as well as guaranteeing that you are billing accurately, and being paid for the work being completed.

time tracking Atarim

This will greatly help you understand how the whole project comes together, and whether your resources are allocated properly.

Build the Product or the Process

This is where you and your team do your best work. Throughout this phase, you want to be very open in communicating when something is: 

  • On Track
  • At Risk 
  • Off Track

The earlier you do this, the more respect you are going to earn from clients. 

They don’t expect you to be perfect, but they expect you to know how to deal with things when they aren’t perfect, and to be fully transparent. 

Note: We also suggest that, in order to make it possible to track the profitability of your agency over time, you have people on your team (including you) track time on individual things they are working on that are specific to the project. 

Resolve Any Issues

It’s your responsibility, as a project manager, to resolve issues and prevent them from becoming major problems that slow down the whole process. The best way to resolve issues is by using Atarim’s point-and-click collaboration.

In essence, the point-and-click collaboration will allow clients to point on your website at what they’re referring to and immediately leave feedback, say what needs to be changed, and more. 

You can see an example of how it works below.

visual collaboration Atarim

This is super-effective for resolving any issues with the project.

You can skip 10+ back-and-forth emails with clients and your team about what to fix, where the issue is, etc.

Instead, you or your clients just point at it, leave feedback, and resolve it!

#4: Project Monitoring and Controlling

At this stage, you should be 80-90% complete with everything that was in the initial scope. The rest is all about adding the finishing touches to the projects and allowing all stakeholders to leave any feedback.

Monitor Project Progress

It’s essential that you check the project progress to see whether you’re on time and that your resources are in check.

Head over to the Projects Tab, select your project, and click on Milestones.

project milestones Atarim

These can help you see whether your project is on time, since you can see a deadline next to each of the milestones. They will also let you know about the upcoming tasks you’ll have to work on.

You can also check for any overdue tasks from the Boards tab.

overdue tasks in Boards

Finally, check for any comments your clients (or team members) might have left regarding the structure, design, or copy.

To do this, go to the Projects tab and click on the Collaborate icon.

point and click collaboration

From there, you can see all of the comments and suggestions from both your clients and your team.

This will give you a good perspective on how the project is going, and whether there are any necessary changes that you need to make.

Stick to the Plan

Another important thing is to take a look at the project plan one more time. You should compare it with your current project status and see whether there aren’t any things you might have left out.

If you did, find a way to make it work and get aligned with the original plan.

As a project manager, you can make sure that no one deviates from the original plan by establishing Key Performance Indicators (KPI).

  • Timeliness. This is making sure your project is done on time – and if it’s not, tracking where it’s off-target is critical so you can always have an estimated completion date.
  • Budget. Are you going to stay under the budget you’ve allocated, or is the project exceeding costs?
  • Quality. How well has the project progressed? Are those working on it or benefitting from it satisfied?
  • Effectiveness. Are you spending your time and money appropriately, or could you be managing the project more effectively?

#5: Project Finalization

Now that the project is considered ready to launch, you should run through your list of final checks. 

This will vary based on your tech stack, but should include: 

  • Testing. 
  • Client and team training. (Training the team/people that are going to be using the new project on how it works.)

For instance, if you were creating a website project, you’d also help clients with setting up analytics tools such as Google Analytics, or conducting an SEO audit. 

This will vary greatly depending on the type of project you created.

Review & Hand Over Deliverables

Once everything is finished, it’s time to test and review the entire project and complete a detailed report that covers every aspect.

You can easily do that by sharing Atarim’s detailed report from the dashboard (exported as a beautifully designed PDF).

export project report Atarim

If everything works as expected, you can now hand over the deliverables to your clients.

Document Project Learnings 

Most teams hold a reflection meeting after the completion of a project in order to contemplate their successes and failures during the project. 

This is an effective method to ensure continuous improvement within the company to enhance the overall productivity of the team in the future. Organizations handle lessons learned using the five-step process outlined below:

Recognize

The first stage is to recognize and compile the fresh learning discovered. 

The main goal is to understand what went well, what didn’t, and what can be done better. Future initiatives will benefit from the recommendations that are identified.

Document

All of these fresh teachings must be formally recorded. 

And all pertinent stakeholders inside the organization must be informed of these.

Examine

After that, you need to examine all of these new lessons learned to determine the best way in which to apply them. 

Store

It is equally crucial to use technologies to store all of this knowledge so that the entire business may easily access it. 

Recover

The knowledge and lessons learned must be used in ongoing projects.

For instance, you can take a look at the data from timers inside Atarim and leverage this information to enable you to create better estimates for future projects and tasks.

create time estimations in Atarim

#6: Ongoing Improvement

The final phase, which carries onward into any ongoing engagements that you have with clients, is improvement. 

This is your opportunity to get the best clients onto a retainer where you continue to work with them in the form of an advisor. For instance, you can manage their hosting, or work through the list of requests out of scope with the capacity to tackle a certain amount per month.

After Action Report – Are You Ready to Manage Your Next Project?

Managing projects doesn’t have to be a long and tedious process. In fact, if you know what you’re doing, it might be an exciting opportunity to create an awesome product, learn something new, and help your clients.

Plus, if you manage your projects properly, you can maximize the chances of making each of your projects successful – and avoid running out of resources.

And that’s exactly what Atarim can help you with!

Atarim can help you centralize all communications, assign tasks to team members, set deadlines, eliminate any guesswork, and manage projects like a PRO. Plus, with our time tracking feature, you’ll know exactly how long each task took, so you can discover your rates, make better time estimates, and prevent selling yourself short.

Also, you can leverage our point-and-click collaboration to allow clients to point at what they’re referring to and immediately leave feedback and say what needs to be changed.

If you want to eliminate most scalability challenges such as confusion, communication issues, or poor resource planning, give Atarim a shot for FREE now.

  • Integrated into the leading visual collaboration platform trusted by 13,000+ agencies (web dev, design, and beyond) worldwide.
  • Supporting project delivery for 1,200,000+ of their clients and stakeholders.
  • Deliver projects in weeks instead of months.

The Best Project Management Software to Run Your Web Design Agency

Tired of disorganized projects and missed deadlines? 

In this guide, we’ll look at the best project management solutions you can use to supercharge your web design agency. 

Here’s what we’ll cover: 

In this post, we’ll discuss the benefits of using project management software and how to choose the right one for your agency. 

We’ve scrutinized 100+ of the most popular project management solutions, and narrowed this list down to our top 5, to help save you time!

What Is Project Management Software And Why Is It Important?

Project management software solutions provide a tool or platform that is used to plan, organize, and manage resources to achieve specific goals and objectives. 

They help teams to stay organized, meet deadlines, and deliver high-quality results.

Project management software typically includes features such as:

  • Task management
  • Calendars
  • Time tracking
  • Progress tracking
  • Collaboration tools

All of these features are super-helpful for teams to:

  • Create and assign tasks
  • Set due dates and dependencies
  • Track progress
  • Communicate with each other
  • Share files

Choosing the right project management tool is essential because it will allow you and your team to work more efficiently and achieve your goals faster.

Without such a tool, your projects will more likely experience delays or cost overruns.

What To Look For In Agency Project Management Software

When looking for project management software for your web design agency, there are several key features and functionalities to consider:.

Here are the 5 key points to consider extremely carefully when considering which project management solution to choose.

#1 – Balance Between Ease of Use and Functionality

A good project management product must strike the right balance between ease of use and functionality. If it’s too complex, your team may be less likely to use it – leading to inefficiencies and delays.

But this doesn’t mean it should be super simple and include ONLY the most basic features.

Functionality is essential because it provides teams with the tools and features they need to manage projects effectively. Without sufficient project management functionality, teams may struggle to track progress, meet deadlines, and deliver high-quality results.

Here is a list of functionalities that every good project management software tool should have:

  1. Task management: The ability to create, assign, and track tasks is essential for any project management software package. Look for one that allows you to easily create and manage tasks, set due dates, and track progress.
  2. Collaboration and communication: Look for a tool that allows team members to collaborate and communicate with one another easily. This includes features such as comments, mentions, and file sharing.
  3. User-friendly interface: A good tool should have a user-friendly interface, making it easy for team members to get started and become productive quickly.
  4. Reporting and analytics: The best project management tool should offer reporting and analytics, which can help you track project progress and identify areas for improvement.

#2 – Web Development-Specific Features

Web development agencies have unique workflows, and their projects have different life cycles compared to other types of businesses. 

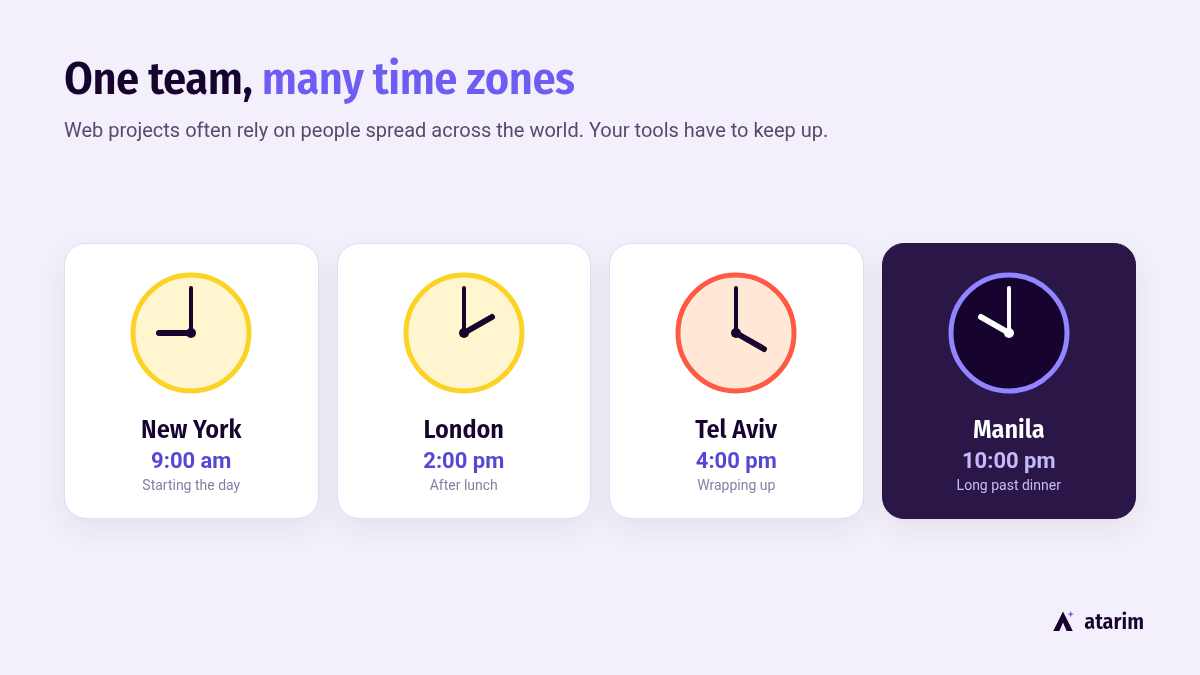
These workflows often rely on people spread across different time zones.

team members spread across different time zones

Source: Youteam

This is why specific tools and features are required to manage those projects effectively. 

Using a project management tool that supports web development-specific workflows rather than a generic tool can help you:

  • Improve collaboration
  • Increase your efficiency 
  • Provide better client visibility

#3 – Performance and reliability

Performance and reliability are essential aspects of a good project management tool. 

A good project management solution should be able to handle large amounts of data and multiple users without slowing down or crashing.

You should also NOT experience frequent downtime or errors. 

Having project management software that offers performance and reliability is essential for teams to manage their projects effectively. A product that is slow or prone to errors can cause delays – making it difficult for teams to stay organized and on track. 

#4 – Price

Price is an important factor to consider when choosing a project management tool, as it can significantly impact overall profits. An expensive product can eat into the budget and potentially limit the resources.

But if you go for a cheap solution, you may not have all of the necessary features and functionalities to get the job done effectively.

When evaluating different project management solutions, it’s vital to consider both:

  • The upfront cost
  • The long-term costs

For instance, suppose you need to use a file-sharing service and a time-tracking utility along with the project management tool. 

In that case, it might be cheaper to find a solution that offers all three functionalities.

#5 – Integration

Integrating with other tools and services, such as:

  • Slack
  • Gmail
  • Jira, etc

…can help streamline the project management process and provide teams with a more seamless workflow.

In essence, you can use your 10+ favorite apps together and create something awesome.

5 Best Project Management Software Solutions

#1: Atarim 

Atarim is a project management tool designed specifically for web design and development agencies. Unlike other generic project management tools, Atarim is tailored to these businesses’ unique needs and workflows.

It offers a range of features designed to help agencies streamline their workflow, improve collaboration with clients, and increase profitability. With Atarim, teams can take control of their workflow and target the actual work swiftly and accurately by collaborating with clients in a unique, visual way, instead of wasting hours on unnecessary or unhelpful communication.

Pricing: Individual developers can use Atarim for free. Team plans start at $25/month for up to 5 team members.

Atarim

The most popular features of Atarim are:

  • Task management
  • Time tracking
  • Real-time team activity tracking
  • Visual project management
  • Wireframing templates
  • Unlimited image-based feedback
  • Auto-optimize images for web use

Atarim can also help to save money by reducing the need for multiple tools, and reducing project completion time by 75%.

The key to a successful project management solution is finding the right balance between ease of use and functionality. Atarim understands that adopting the tool is crucial for both your internal team and external clients. 

That’s why Atarim has been designed to be user-friendly while still offering robust features.

Atarim dashboard

One of the unique features of Atarim is its ability to allow clients to leave requests on any digital project visually, eliminating the need for them to generate tickets on another issue-tracking platform.

This feature allows for efficient and seamless collaboration between clients and the team, increasing productivity and profitability.

#2: ClickUp

ClickUp is a project management tool that offers a range of features to help teams manage and track projects of any type. It allows teams to break down projects into customized tasks, create documents, collaborate using whiteboards, and visualize progress.

Pricing: It offers a free plan with a storage limit of 100MB. Unlimited plans start at $5/month for each team member.

ClickUp

There are a variety of features that can help streamline the workflow and improve collaboration among team members. 

These features include:

  • Task management
  • Calendars
  • Time tracking
  • Progress tracking

You will also get in-depth reports and analytics about your projects.

ClickUp allows you to generate customizable reports, track metrics, and visualize data through charts and graphs. This helps you, your team, and stakeholders make data-driven decisions and monitor project health. 

In addition to all of these great features, ClickUp also offers a range of platform features, such as: 

  • Templates
  • ClickApps
  • Integrations
  • Customizable views

Plus, ClickUp also provides a robust automation feature for automating those repetitive tasks that seem to take up so much of our time.

ClickUp robust automation features

For instance, you can automate actions based on triggers, conditions, and actions, reducing manual effort and improving productivity. The automation capability can save significant time and really streamline workflows.

You will also receive solutions for specific teams such as engineering, design, and HR with ClickUp.

#3: Basecamp

Basecamp is a platform for project management, offering a centralized platform for team communication, task management, and file sharing. Its message boards and file storage tools allow team members to share information and collaborate on projects easily.

There’s really not much that Basecamp can’t do since it’s an advanced all-in-one platform.

It combines project management, team communication, file sharing, scheduling, and task management capabilities. This integration reduces the need for multiple tools and promotes a centralized and streamlined workflow. 

Pricing: The basic plan costs $15/month for each user. 

Basecamp

It includes a calendar feature that will allow users to:

  • Set up events
  • Create deadlines
  • Add milestones
  • Subscribe with Google Calendar/iCal/Outlook

You can also discuss events on your own page, and notify people when things change.

In fact, collaboration is one of our favorite features of Basecamp. 

Basecamp collaboration

The Basecamp platform allows users to invite clients or external stakeholders to participate in projects, providing them with controlled access to specific discussions, files, and tasks. This feature streamlines client communication and promotes transparency in project management. 

Basecamp also provides a scheduling feature that lets you keep track of project timelines and deadlines. 

It has a clean interface, and it’s easy for both technical and non-technical team members.

#4: Trello

Trello is a productivity tool that helps teams organize and manage tasks using boards, lists, and cards. It’s simple and flexible and allows teams to customize workflows to fit their needs. 

Pricing: They offer a free plan with limited features. Paid plans start at $5/month for each user.

Trello

Trello offers several powerful features, including:

  • Templates
  • Timeline view
  • Calendar view
  • Integrations
  • Butler automation – Trelo’s built-in no-code automation tool.

Their “kanban” boards make it easy to visualize the progress of a project, and the flexibility of these boards allows teams to customize them how they wish. 

What makes Trello really powerful is its focus on collaboration and customization.

Trello emphasizes collaboration and team communication with options for:

  • Assigning tasks to team members
  • Leaving comments on individual cards

This fosters collaboration and keeps everyone updated on project developments. 

Plus, you can tailor Trello’s boards and cards to match your needs. 

Trello board

For instance, you can create custom labels, set due dates, create checklists, and add attachments. This flexibility enables users to adapt Trello to various project management methodologies and workflows.

Trello also offers a wide range of third-party apps and power-ups, which allow teams to add more functionality and automation to their boards.

#5: Asana

Asana is a project management tool that helps teams plan, organize, and manage their work. It is a collaboration tool where users can coordinate tasks and share feedback, files, and status updates.

Pricing: Basic plan is available for free. The Premium plan starts at $10.99/month for each user.

Asana

Asana allows teams to easily create and assign tasks, set deadlines, dependencies, and track progress. Additionally, Asana enables team members to collaborate and communicate effectively through comments, mentions, and attachments.

It’s super-effective (and unique) for advanced reporting and project management.

For instance, Asana provides tools for:

  • Creating project templates
  • Setting up recurring tasks
  • Establishing project goals

These features help teams streamline their workflows, automate repetitive tasks, and maintain consistency across projects.

Asana streamline workflow

Asana can also help you distribute your resources and workload more efficiently. These features will help you prevent overallocation or underutilization. Users can assign tasks, track progress, and visualize each team member’s workload, ensuring a fair distribution of work and optimizing productivity. 

Plus, if you’re managing multiple projects, you can monitor all of them at the same time. This is super-useful for managers who need to monitor progress, allocate resources, and make decisions based on the performance of multiple projects. 

Asana is used by teams from various industries and offers integrations with other tools and services.

After Action Report – Choosing The Right Agency Project Management Software For You

When choosing the project management software for your agency, it’s essential to find one that offers a workflow that suits both your business and your clients’ needs.

While most project management platforms, such as Asana or Basecamp revolve around a broad range of businesses, Atarim has been built specifically for web design and dev agencies.


Looking to manage your projects like a PRO?

Atarim offers painless project management tailored to web design and dev agencies.

One of our unique and revolutionary features is that our tool has been built on the foundation of point-and-click collaboration – allowing clients to point at what they’re referring to and then immediately leave feedback, say what needs to be changed, etc. 

If your main objective is to manage web dev and design projects and maximize your profits, give Atarim a shot right now – it’s FREE.

  • Integrated into the leading visual collaboration platform trusted by 13,000+ agencies (web dev, design, and beyond) worldwide.
  • Supporting project delivery for 1,200,000+ of their clients and stakeholders.
  • Deliver projects in weeks instead of months.

Critical Chain Project Management – Agile’s Missing Link

12% of the money invested into projects is lost to poor planning. If project delays are holding you back, then implementing a project management system can help your team get more things done and, ultimately, boost your company’s bottom line. 

But projects are hardly simple.

Rather than tackling tasks one at a time, teams usually work on several deliverables at the same time in order to complete various project components on schedule. However, some tasks can’t begin until others are completed, and in this way, one single holdup (referred to as a dependency) can cause a bottleneck – and completely derail your entire project. 

Without a system to organize and manage all those interconnected tasks, predicting how much time is needed to complete the project is difficult. 

That’s where critical chain project management can help.

Implementing critical chain project management (CCPM) planning helps teams pinpoint and resolve chokepoints in processes, and allocate resources more effectively to complete those tasks.

This article will cover how to apply the CCPM process to your agile workflow, so you can reap the benefits of better quality outcomes and fewer delays. 

What Is Critical Chain Project Management?

Critical chain project management (CCPM) helps teams to identify task and resource dependencies so that they can complete projects faster. Many agile teams fail to hit their project deadlines.

In fact, over 50% of projects suffer from scope creep, meaning teams fail to plan for additional requirements beyond the original goals. 

CCPM adds flexibility to any agile workflow by maximizing limited resources and providing buffers to avoid delays and uncertainties. 

Let’s take a look at an example.

A SaaS company plans to introduce a new feature to its app. This requires a sequence of tasks that must be completed in sequential order by different parties to get the final initiative completed. 

Here’s what that might look like: 

  • Conduct an initial meeting 
  • Write the specifications for the new feature 
  • Design the UX/UI design 
  • Code the feature 
  • Release the beta feature 
  • Make improvements based on feedback 
  • Write tutorials for users 
  • Publish and promote the new features 
  • Write press releases and advertise the app 

Looking at this list of tasks, it’s clear that some tasks are dependent on others. For instance, you can’t advertise and publish without first designing or coding the feature. That said, you can work on some tasks independently, such as writing the tutorials, while the feature is in the beta test phase. 

If you want to use the critical chain project method, it will look something like this: 

critical chain project method

Source | View larger image

Notice how the diagram organizes tasks by serial and parallel tasks. The serial tasks show the sequence of tasks that must be done in sequential order. Parallel tasks are shown above and below, any of which can be done simultaneously. 

As a project manager or leader of your team, you’ll need to examine your resources and allocate them effectively to determine the deadlines. 

For instance, if you’ve got a team of two programmers, and one is on vacation, you’ll need to plan the expected deadlines appropriately. 

In this scenario, you may need the following resources: 

  • Project manager 
  • Software engineer or developer 
  • PR manager 
  • Copywriter 
  • QA team 
  • Social media manager 
  • Tools – development tools for coding, design tools to create prototypes, marketing platforms to advertise, and project management software 

Lastly, the critical chain project management method places buffer time to account for any unforeseen circumstances. 

Notice the project buffer of 7 days and feeder buffer of 3 days in the diagram above. 

The Critical Chain vs. The Critical Path

Critical chain and critical path project management methods are very similar, except the critical chain method prioritizes resource constraints and dependencies. 

The critical path method works by identifying the critical path, which is a string of the most important sequence of tasks required to finish a project. This allows teams to separate high-priority versus low-priority tasks. Any tasks that aren’t part of the critical path will be placed into a lower priority. 

Here’s what a critical path would look like for a blog post:

critical path for a blog post

Source | View larger image

Notice how only the tasks that are absolutely necessary for project completion are included in the critical path. Designing blog visuals and animations may be helpful, but they aren’t mission-critical tasks. 

You can see there are many buffer times included in the critical path methodology. The critical chain method places various buffers throughout the project timeline. Since there are so many unknown variables at play, this method adds a buffer to mitigate risks that can derail the project timeline. 

To summarize the differences between the two, we’ve put together a table. 

Critical Path Critical Chain 
PriorityFocuses on identifying the string of tasks that take the longest to complete and organize other project activities around it Focuses on managing the dependencies and resource constraints to build a realistic timeframe 
ResourcesAssumes that resources are always available Focuses on managing limited resources, so they can be used most effectively 
BufferDoesn’t include specific buffer times, leaving no room for error Adds multiple points of buffer time including for the entire project, resources and feeding buffer
MultitaskingAllows for multitaskingEncourages focusing on doing one task at a time
DeadlinesSuccess is measured by whether deadlines for individual tasks were metSuccess is measured based on how quickly you’re consuming your buffers 

Of the two, the critical chain is more flexible and modifies some of the flaws that exist with the critical path methodology. 

It mitigates inefficiencies by avoiding task switching (where employees can be less efficient than focusing on a single task at a time) and Parkinson’s Law (where team members can procrastinate and do the bare minimum to hit the deadline). 

The Components of a Critical Chain

The critical chain methodology has three components: the critical path, the feeding chain, and resource buffers. 

#1: The Critical Path

The critical path is a list of all mission-critical tasks that are absolutely necessary to get the job done. They hold dependencies that must be done in a specific order. 

If you were to bake the cake, you’d have to follow a sequence of steps. The critical path is all of the red items necessary for the cake to be completed. 

critical path and parallel activities

Source

#2: The Feeding Chain

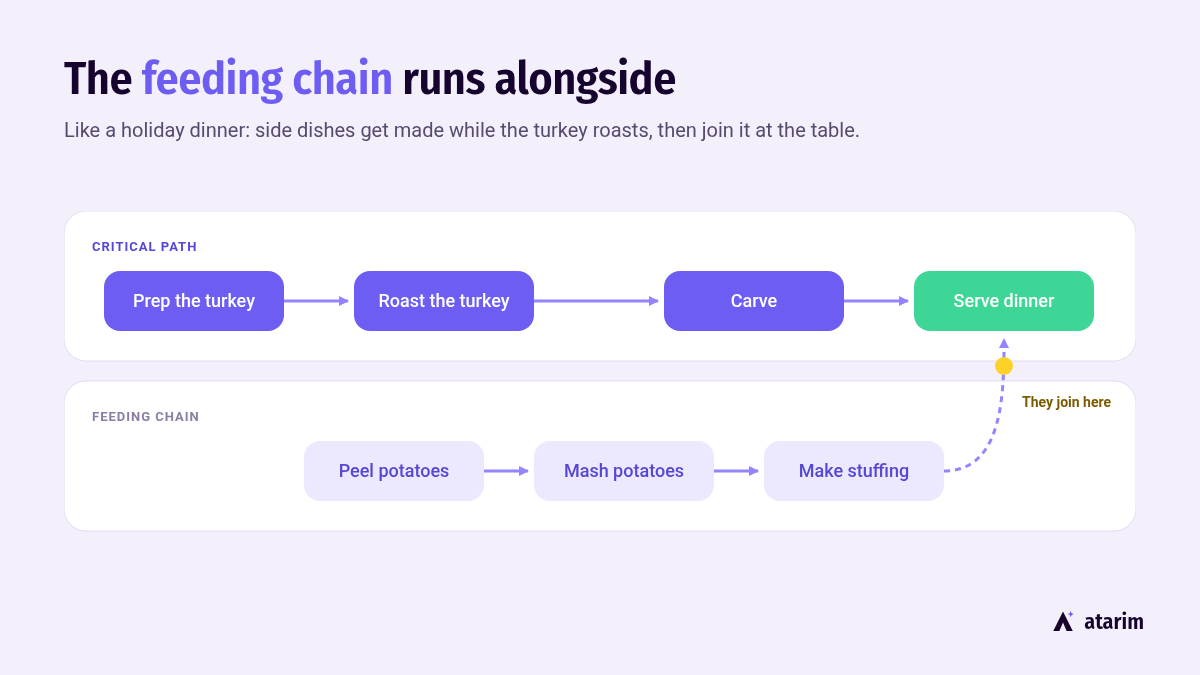
The feeding chain is a list of secondary tasks that run alongside the critical path. Eventually, the feeding chains merge with the critical path. 

The feeding chain must run at the same time at the critical path to avoid delays. 

the feeding chain running alongside the critical path

In this diagram, all the gray boxes are the feed chain. 

Think of a simple project, like cooking a Thanksgiving Dinner. While the turkey is in the oven, you can focus on whipping up the side dishes, such as mashed potatoes and stuffing. 

#3: The Resource Buffers

Resource buffers are resources that are set aside for unexpected occurrences. For example, additional contractors may need to be staffed for a special project. In this case, you may have a small network of contractors that keep on hand, but outside of your payroll, in the event that unexpected scope creep occurs. 

Let’s say a client makes a last-minute adjustment to your web design project. Accounting for current work hours, you’ll need to quickly bring on board a part-time contractor to complete the task. 

5 Steps to Use the Critical Chain Project Management Process

If you’re looking to implement the CCPM process into your workflow, try these five steps to get you started. 

We’ll be demonstrating examples of how to implement this methodology with Atarim for resource planning, dividing projects into multiple steps, tracking time, making better estimates, and keeping everyone focused. 

#1: Identify the Critical Path First

Think of the critical path as the spinal cord to your project. Everything should revolve around the critical path. Here’s how you can find the critical path to build your CCPM:

1. List activities: List all tasks required to produce deliverables. 

List all tasks required to produce deliverables

Source

2. Identify dependencies: Determine the tasks that are dependent on each other. 

3. Create a network diagram: Turn the list into a flowchart that displays the sequential order of the activities. Create arrows to highlight those task dependencies. 

Now you should have a rough estimate of where each task should be placed based on the start and end date. You can align the parallel tasks with the serial tasks to maximize efficiency. 

network diagram

Source

#2: Determine the Exact Amount of Resources Your Project Requires

Next, you want to estimate the duration of each task. You can use previous project data, make an educated guess, or use industry-standard metrics. 

estimate the duration of each task

Source

The resources may refer to the actual tools or software your team needs to create the end result, the amount of time, and the specific workers needed to complete each task. 

When evaluating your resources, you want to think of other possible constraints, such as: 

  • Market constraints. Not enough demand in the market compared to the amount you can produce 
  • Material constraints. Shortage of inputs or raw materials 
  • Policy constraints. Regulations or organization policies that affect resources, such as banning overtime work 

This helps to mitigate project risks, ensuring no stone is left unturned.

► With Atarim, you can create stages, giving each phase of the project a name and due date. 

creating a CCPM workflow in Atarim

Source

Each stage can be in a sequential order, which serves as a dependency. Once you’ve added the string of tasks, you’ll have created a CCPM workflow. 

creating a dependency

Source

#3: Place Your Buffers

Buffers help to ensure that you guarantee the project is finished on or before the projected deadline with a high probability. 

The deadline you’ve set in the last step is referred to as the 50 percent confidence interval without buffer. Essentially, your goal is to add the following buffers in the right spots. 

  • Project buffer: time added to the end of all project activities to account for delays. 
  • Feeding buffer: time buffer added to non-critical tasks located on the critical path, ensuring that your team has the necessary inputs and resources to start on time. 
  • Resource buffer: time buffer to account for resource limitations, so you’re able to get the resources when needed.
placing buffers

Source

In this diagram, notice that a project buffer is added at the end, while feeding buffers are added at the connection points where they join the critical chain. 

#4: Keep Team Members Focused

As a project manager, it’s your job to ensure all team members stay on schedule. With the CCPM model, the tight duration estimates with single tasks assigned to each person help to eliminate multitasking. 

Also, having dependencies where others are reliant on your completion will prevent Parkinson’s Law, where work expands to fill up the time allotted, or student’s syndrome, where workers procrastinate on starting new tasks. 

Instead, team members will work to finish the chain of tasks as fast as possible. 

For instance, Atarim makes it easy for everyone to stay on task. The Tasks inbox is where the worker can see all their tasks across all assets. 

task inbox

Source

By clicking on each task, it will link directly to the live website – and the specific area of the website that needs to be addressed. Also, the dashboard shows exactly how many pending urgent tasks there are. 

#5: Oversee The Project

Once you’ve built your visual diagram, time frames, and buffers, you’re ready to write your project plan. At this stage you should monitor your resources, and reallocate time, labor, or tools as necessary. 

Using the Kanban board on Atarim, you can manage the flow of work. This is based on the just-in-time production principle, which focuses on balancing demand with the available resources. 

Kanban board in Atarim

Source

Conclusion – Get the Most Out of Critical Chain With Atarim 

Prioritizing the resources needed to complete a project helps project managers build a process that is easier to manage. If you plan your projects properly, you will never miss your deadlines because you’ll put down enough time buffers for any problems or delays along the way.

However, the real power of this approach comes when you’ve got the right platform behind you. 

Atarim is the leading visual collaboration platform trusted by 13,000+ agencies worldwide (web dev, design, and beyond), supporting project delivery for 1,200,000+ of their clients. We have redefined how they work with their clients and team, eliminating client delays and enjoying the ability to deliver projects in weeks instead of months. 

Agencies, developers, and project managers use Atarim to eliminate the need to rely on guesswork and endless back-and-forth email communication, beyond collaboration also powering reporting, time tracking, work summaries and more. 

Atarim gives you everything you need to build out visual timelines for CCPM, and assign them to the right people. From simple design projects to managing your client’s live websites, Atarim helps you increase work velocity and improve collaboration – empowering your team to get more done. 

► Try Atarim for free, and leverage the CCPM approach to allow you to finish more projects on time, right now.

Charging for Discovery – The Problem With Free Discovery Calls

The problem with ‘free’ is that it doesn’t generally pay many bills.

Running an agency costs money (assuming your team doesn’t work purely for the love of it, expecting no financial reward). Free is a concept that doesn’t tend to sit terribly comfortably alongside bottom lines, running costs, or profitability.

And there’s another thing too.

‘Free’ is a bad valuation to have associated with your agency. What worth do you feel you can offer? If ‘free’ is how you value your own worth, then what message does that convey?

That’s not to say that discovery calls aren’t a vital element of running your business. They’re essential for:

  • Uncovering the client’s issues
  • Identifying the main objectives
  • Establishing expectations and outcomes

Plus, they can help you discover whether there is a market for your product – helping you prevent the #2 most common reason for startup failures.

top reasons why startups fail

Source: HSTK

If you are thorough, the discovery process can take many hours to get done…

…and if later you find out that a potential client changed their mind and decided not to go with you – both your time and your money will have been wasted.

That’s why we at Atarim believe that paid discovery makes a great deal of sense.

In this post, you’ll learn everything about charging for discovery – and how to do it properly.

The 5 Problems With Free Discovery Calls

Here are the 5 main issues with offering free discovery calls. 

#1 – It’s Just Not Perceived as Valuable

If you’re offered something for FREE, people take it for granted.

It’s hard for clients to attach any sort of value to the discovery process, especially when they perceive it as just a series of “meetings”.

In their minds, it’s just another conversation…

In fact, you might experience instances where clients may cancel or postpone discovery meetings, almost to the point where you might feel they’re doing you a favor by responding to your questions. 

#2 – It’s Difficult to Remain Motivated and Invest Enough Time

When you’re doing something for free, it’s obviously not possible to keep yourself motivated throughout the process. There are going to be instances when you’ll feel uninspired, and just run it pro forma.

However, this changes when you get paid for discovery.

You’ll obviously go the extra mile and put your heart into it, which is ultimately what’ll help you determine whether you and the client are a good fit for each other. 

#3 – Doesn’t Help in Screening Bad Clients

You might spend hours on preparing a proposal and running discovery for a potential client. Yet, you’ll later only find that they just weren’t serious from the get-go – and you’ll feel disappointed and frustrated at having wasted tons of time.

Fortunately, you can prevent that by charging for discovery.

Plus it will help you know just how serious your potential clients are – and save you a lot of headaches and wasted hours. If you’re charging clients for discovery, you’ll know just how serious they are. 

#4 – Reduced Profitability

Of course, if you’re not charging for discovery, you can’t make a profit. In fact, it might go the opposite way and only waste your time and money, which will have a negative impact on your profitability.

That’s why we highly suggest charging for discovery.

#5 – Increased Sales Risk

A free discovery is essentially a sales pitch you offer to potential clients.

Based on the discovery, you’re asking them to sign on. Unfortunately, this type of relationship isn’t that strong and can easily break – losing potential clients.

On the other hand, charging for the discovery process creates a transactional relationship.

This type of relationship with your clients is a lot stronger since they have already invested an initial payment – they get their skin in the game. By paying a small amount upfront, clients can get a better understanding of whether working with you would be a good fit in the long run or not. 

In the same way, it’ll give you a better idea too.

building a rapport with a client

The 3 Main Benefits of Charging for Discovery

There are several major benefits that you get when you start charging for discovery. Here are the three that we find the most important.

#1 – Bring Down Your Sales Overhead Expenditure

When you charge for discovery, you’ll reduce the number of working hours for free. This way, your sales overhead allocation is going to reduce immediately.

As you start closing more sales, your ROI will rise while your CAC is going to reduce. 

#2 – Invest in the Discovery Phase

When you’re getting paid for discovery, you’ll prepare documents that are more detailed. 

You’ll be more willing to invest time and money into the discovery phase, all of which will contribute to a better standard of service. 

#3 – Finding the Right Client Fit

Finding the right client fit becomes easier by charging for discovery, especially since both parties will align with the same objectives. 

It’s the best way to screen out bad clients and find those who value your time and services. 

Here’s a simple example: 

If a client has a fairly small budget, they won’t be willing to go with discovery anyway, and you’ll know that it’s not worth pursuing their business in the long run.

finding the right client fit

How to Charge for Discovery

Before you start charging for discovery, you need to provide some sort of justification. 

Ideally, when you’re pricing the project for discovery, you’ll want to charge anywhere between 5-10% of the total value of the project.

This means that if a project is worth $10k, you can charge between $500 – $1000 for the discovery phase.

What If the Project Is Too Small?

Some projects just aren’t big enough for you to charge for discovery in the first place. Ideally, you can charge for discovery if the project costs upwards of $5,000. For smaller projects, you generally won’t have to spend a lot of time during discovery. 

This makes it difficult for you to sell paid discovery in the first place, plus your clients have a limited budget to allocate to discovery.

Therefore, ensure you never start the discovery process unless you have clients sign off on it. Prepare a discovery document and make sure your client confirms it before you start off on the project so that both you and the client can come back to it later on. 

Identifying the Deliverables

When you charge for discovery, your client’s going to expect something in return. 

It’s up to you to educate the client and to explain to them exactly what they’re going to get at the end of the discovery phase. 

Here are the documents that you should offer to your client at the end of discovery.

A Brief about the Company’s Market Position

This is an introductory document that outlines your understanding of the company itself. 

The company brief is a great way to show the client that you understand their major pain points and can help them. 

steps for writing company brief document

Source: SlideTeam

A Detailed Website Analysis

Think of website analysis as a detailed teardown of the client’s website and your analysis of its features. You can add virtually anything you want here, as long as you don’t allocate too many resources to the process. 

detailed website analysis

Source: Hotjar

It’s an excellent way to outline your skills and give the client an idea of what to expect. 

This would include:

  • The sitemap (content, images, functionalities for each page, design inspiration)
  • General functionalities such as integrations for Google Analytics and WordPress plugins
  • A list of third-party licenses that’ll be required to complete the project
  • Any future plugins or addons that will be required for the project

A Marketing Strategy

If you want to go all-out with the discovery plan, include a marketing strategy in there too. 

The marketing plan or strategy is a simple document that includes a list of marketing opportunities that you’ve identified for clients. 

effective marketing strategy

Source: Media Exchange

A Comprehensive Quote

Finally, you’ll also want to include a detailed quote that covers the costs for: 

  • Design
  • Development
  • Deployment 

Make sure to break down the costs in different phases so that clients have a clear idea of what they’re paying for. 

Optimize Your Paid Discovery Process

Since you’re charging clients for delivery, it’s important to focus on optimizing the paid discovery process. There are several things that you can do to make sure that your discovery process offers value to your clients. 

Divide It into Phases

The best thing to do is to divide your discovery process into different phases. 

Atarim helps you create stages and milestones for your projects.

stages and milestones inside Atarim

You can take advantage of that feature, and divide the discovery process into multiple phases – and set deadlines for each phase. This will give the discovery process a structure and will make it more organized. 

► For a detailed guide on doing this easily, check out our video on how to create milestones with Atarim.  

It’s always tempting to let a client know that you’re starting discovery immediately. 

However, in our experience, that’s not always a good idea.

Instead, you should hold off and tell them that you’re going to gather information first. This extra bit of research may prove to be invaluable in the long run, and it also leaves an impression on the client that your services are in high demand.

Prepare a Questionnaire

If you need information about the client’s business to gain a better understanding, using a questionnaire is a great idea.

Atarim allows you to create detailed and appealing discovery forms in seconds.

All you have to do is create a new form, add questions, and share it with clients.

create a discovery form Atarim

To make the most out of the questionnaire, we suggest asking about:

  • Company’s unique selling proposition
  • Major issues they are facing
  • Client’s buyer persona

You can also create Form templates with Atarim that you can re-use with future clients.

use form templates Atarim

Leveraging Atarim eliminates the need to use Google Forms or other 3rd-party software tools, and allows you to centralize all of your information into a single place that everyone involved in a project can access.

Prepare a Discovery Report or Presentation

At the end of the discovery phase, you may want to consider presenting a detailed report or presentation to the client. Think of this as a round-up of everything that you’ve gathered. 

You could share it with the client over a Google Meet or a Zoom call, and it should ideally include the following:

  • Information round-up
  • Recommendations for different marketing strategies
  • An understanding of their buyer persona
  • A summary outlining the scope of the project
  • Comprehensive quote for the work
  • A brief section for Q&A for all attendees

Once you’re done, you can then discuss the next steps with the client. 

If there’s an issue with the budget for the project, now’s the time to discuss it. Make sure you get approvals for each stage of the project before you proceed further. 

Conclusion – Paid Discovery Sets the Tone for the Project

Before you start investing considerable time and resources into any project, it’s important that you run discovery. Smaller agencies may scoff at this or not take it seriously, but it could prove to be a major differentiating factor. 

It can help you uncover hidden issues and establish realistic expectations for your clients.

And we are here to help you with that! 

Atarim can help you create client discovery forms in seconds and divide the discovery (and the whole project!) into milestones and phases. Plus, you can store and organize all discovery material for clients in one place.

And if your clients decide to pursue the project with you, you’ll get even better benefits.

Our tool will allow you to  add tasks with urgency and deadlines so you know precisely what to work on and keep everything organized.

Also, you can leverage our widely praised point-and-click collaboration feature to allow clients to point at what they’re referring to and immediately leave feedback, say what needs to be changed, and so much more. 

If you want to streamline the discovery process, give Atarim a shot for free now.

  • Integrated into the leading visual collaboration platform trusted by 13,000+ agencies (web dev, design, and beyond) worldwide.
  • Supporting project delivery for 1,200,000+ of their clients and stakeholders.
  • Deliver projects in weeks instead of months.

How to Deal With Imposter Syndrome as an Agency Owner

Imposter syndrome can make you feel like a fraud.

You’ll experience feelings of self-doubt, fear, and anxiety – constantly worrying about being exposed. If you’ve ever experienced any of these symptoms, you’re not alone…

In fact, 65% of professionals today suffer from imposter syndrome.

Unfortunately, most agency owners will never resolve imposter syndrome, and as a result, their agency suffers. In this post, you’ll discover how to eliminate the imposter syndrome for you and your agency, so you can feel positive about making positive change!

Imposter Syndrome

What Is Imposter Syndrome?

Imposter syndrome is a condition in which you feel anxious, and doubt your skills and accomplishments – while having a constant fear of being exposed as a fraud.

It can be broken down into these five basic types:

imposter syndrome types

Source: Asana

Understanding Imposter Syndrome

Even though imposter syndrome is not a diagnosable mental illness, it can still weigh heavily on a person’s mental health. 

Here are three factors that may contribute to experiencing imposter syndrome.

#1 – Personality

Some personality types are more linked to internalizing feelings of pressure, doubt, and failure. Imposter syndrome traits are commonly seen in the Turbulent personality type.

turbulent personality type

Of course, impostor syndrome can plague any personality type. 

However, people who rely on the Turbulent strategies of constant improvement and social engagement are much more likely to experience imposter syndrome.

#2 – Social Pressures

This can especially occur when you’re part of a social circle or group where approval or worth seems to be explicitly connected to achievement.

social pressure imposter syndrome

Source: MBAROIN

For instance, last quarter, you might have been invited to a monthly executive dinner after surpassing a sales record, and being the hero of the sales team.

But this quarter, your numbers are down, and your invitation is nowhere to be found.

#3 – Sense of Belonging

Part of imposter syndrome is the fear of being found out and cast out.

Any circumstance that makes a person feel different or excluded from a group may carry that persistent sense of not belonging – long after the circumstance is resolved. 

sense of not belonging

Source: Frontiers

How Do You Know Whether You Struggle with Imposter Syndrome?

You might be wondering whether you’re struggling with imposter syndrome, or it’s just increased self-doubt. 

Let’s clear that up.

Here are the three most common characteristics of imposter syndrome.

#1 – Self-Doubt

If you constantly doubt yourself, and experience a lack of self-worth, it may result in feelings of anxiety regarding your ability to succeed.

Success is viewed as an unattainable and risky goal – something that simply can’t be achieved.

#2 – Sabotaging Self-Success

Imposter syndrome may lead to psyching yourself out.

You’ll start telling yourself that your work will be sloppy and insufficient, which may cause you to put in less effort, attention, and persistence.

#3 – Setting Unrealistic Expectations

You might feel the sensation that your best isn’t enough. 

This often leads to setting unrealistic expectations for yourself – to accommodate for feeling inadequate when accomplishing what are actually realistic, timely, and challenging goals.

How to Beat Imposter Syndrome As an Agency: A Step-By-Step Process

In this section, you’ll discover how to beat imposter syndrome as an agency. By doing this, you’ll no longer have to ask yourself what makes your agency unique.

Instead, you and your team will feel confident, purposeful, and ready to win.

#1 – Define Your Customer Avatar

It’s critical to know precisely who you are serving. You must make your target persona as vivid as possible – and include every possible detail you can.

After doing this, you’ll end up with your ideal customer profile, which can look like below.

ideal buyer persona example

Source: HubSpot

There are a lot of FREE tools such as Make My Persona that can help you do that.

Doing this might not seem important; however, having a clear picture of your ideal customer will give you confidence and a sense of purpose for your agency, so you and your team will no longer struggle with who you serve, and whether you’re a fraud.

#2 – Break Down The Customer’s Key Problems

You must explore the problems and pain points experienced by your ideal customer, so that you can communicate with them based on their challenge, and how the solutions you offer can help directly. This will allow your team to see the exact problems you can solve for your customers.

(Which will eliminate the feelings of being a fraud.)

You can easily find the challenges of your customer by:

  • Interviewing your existing customers
  • Conducting market research
  • Creating feedback forms

#3 – Match Your Customers to Your Strengths

If you can define your strengths and marry them to the problems of your customers, you’ll become the customer’s first choice. Moreover, you won’t be playing on your weaknesses – increasing the risk of failure and feeling inadequate.

To figure out your strengths, you should ask yourself these questions:

  • What do you absolutely love to do?
  • What are you amazing at?
  • What makes you unique?

You can also take the initiative and ask each of your team members about their strengths and weaknesses. That way, you can ensure your whole team plays on its strengths. 

(And by doing this there is a much reduced chance of experiencing imposter syndrome.)

#4 – Build Your Platform

A big part of imposter syndrome is the sense of not belonging – or feeling left out.

Building your platform is all about knowing where to show up to meet your target customers and how to get their attention.

If you followed the steps above, you should know precisely:

  • Who your target audience is
  • What they are struggling with
  • How you can help them with your solution

This ensures you can meet your customers confidently, and provide them with a message that will resonate with them.

5 Tips to Overcome Imposter Syndrome 

You may have found the purpose of your agency – so your organization no longer feels like a fraud. But what about you – and each individual on your team?

In this section, we’ll share our 5 tips to help you and your team overcome imposter syndrome.

#1 – Shift Your Mindset

If you’re feeling like an imposter, you’re likely in a situation outside your comfort zone. 

You can either look at this situation with fear and worry – or take the opposite approach and look at it as an opportunity to grow – which we recommend!

fixed mindset vs growth mindset

Source: Alter Ledger

You might be growing your agency at a rapid pace, expanding your team, or trying a new way of running your company. 

Either way, you’re taking a risk that might lead you to betterment, and that’s a win!

Once you start viewing imposter syndrome as a sign of progress, the self-doubts start turning into affirmations. The next time you feel like you’re not qualified to take on a new opportunity, just remind yourself that you’re pushing your limits and moving towards succeeding as an agency owner.

#2 – Learn From Your Team Members 

Sharing your feelings with co-workers and partners can be difficult.

In fact, a huge 94% of those who have suffered from imposter syndrome haven’t discussed their feelings at work.

85% of women don't speak about fear of being seen as weak

Source: InnovateMR

However, your team members might be exactly the support you need to get through imposter syndrome. Your colleagues might have experienced the same problems you’re facing, and can give you advice on how to overcome them.

#3 – Focus on the Facts

Addressing your feelings is important; however, sometimes, you just have to look at the facts and ignore feelings of doubt and fear. This is because imposter syndrome can make you feel like you’re not good at your job.

However, the reality and facts say otherwise…

If you can look at facts such as your achievements, and finished projects, you can get a better sense of reality, and feel better about yourself.

#4 – Find Resources to Grow

Imposter Syndrome doesn’t always have to be a bad thing.

Instead, if you can look at it from a growth mindset perspective, you can see it as an opportunity to fill in the gaps in your knowledge. 

Hone in on the aspects you think could be improved, and make a plan to work on them. 

#5 – Fake It Until You Make It

This concept can help you tremendously in overcoming imposter syndrome since it can change the way you view yourself (and who you are) as a person.

In essence, you start to act as if you were the person you want to become, which includes:

  • Dressing that way
  • Talking that way
  • Working that way

…and everything else.

As you begin to do this regularly, you’ll naturally start to become the person you’re wanting to be – and overcome imposter syndrome as you do.

It may seem counterintuitive – faking your way through imposter syndrome! But it does actually work. You may have come across the concept of ‘daily affirmations’, and there is actually a lot of evidence to back this approach up. Your brain is eminently programmable, and learns through habits. Fake it regularly enough, and one day you’ll realize you don’t have to fake any more, because that really is who you are now.

Unless you aspire to be a penguin. No daily affirmation or faking it will result in that. Sorry.

Conclusion

Good, clear communication, and clearly defined roles are both essential for eliminating the self doubt that can come from imposter syndrome.

And that’s exactly where Atarim can help.

Atarim cuts any doubt about what is required by completely transforming the way team members communicate about projects and tasks both with their clients, and within teams.

This is through Atarim’s unique visual collaboration approach, eliminating guesswork, and making sure everyone is 100% clear on exactly what needs to be done, where, and by whom.

And with Atarim making it easier than ever to assign specific tasks to individual team members, along with priority ratings and timers/deadlines, everyone knows exactly what they’re doing, what their role is, and how their contribution fits into the whole project.

If you want to eliminate guesswork, poor communication, and vague role responsibilities, try Atarim for free today.

  • Integrated into the leading visual collaboration platform trusted by 13,000+ agencies (web dev, design, and beyond) worldwide.
  • Supporting project delivery for 1,200,000+ of their clients and stakeholders.
  • Deliver projects in weeks instead of months.

Negotiating Your Freelance Rates: How to Work Less And Earn More 

Most freelancers sell themselves short – and if you’re reading this, there’s a big chance you’re one of them. Working endless hours, having no weekends off… 

That’s the harsh reality of most freelancers.

But what if you could work half the hours you currently do, yet get the same salary? 

That’s what we will help you achieve. In this post, you’ll discover how to negotiate your rates and get paid what you deserve!

Most Employers Asking for a Discount Are Willing to Pay Your Desired Rate

Most clients have the budget to pay your standard rate; however, they believe you are willing to work for less – and they’re usually right!

It’s vital to stand your ground and don’t sell yourself short because it will make you look:

  • Unprofessional
  • Desperate

Neither of which is a good look.

If your dream is to become the best graphic designer possible, and help your clients achieve their goals, then never lower your standards.

How to Negotiate Freelance Rates with a New Client

The proper negotiation skills will allow you to work less – and earn more!

In this section, you’ll discover the best actionable ways to negotiate your rates like a pro, and get the rate you always wanted.

#1: Position Yourself as a Professional

This is the most critical step in the negotiation process. It’s all about positioning. You must position yourself correctly – as a valuable asset, not a burden.

Positioning yourself as an asset for a company will help you:

  • Have long-term relationships with customers
  • Move faster in your career
  • Get your desired rate

Here is how most freelance graphic designers “sell” themselves:

bad positioning graphic designer

As you can see, this positioning brings no value to your clients and does not separate you from the rest – anyone can create a bunch of graphics.

Now compare it to the proper positioning you can see below.

proper positioning graphic designer

You can immediately see the unique selling proposition, and the value.

To get this right, you must shift your mindset and view yourself as a professional. Here are a few questions that can help you with that:

  • What are the company’s main goals and objectives?
  • What relevant results can I bring to my clients?
  • What separates me from my competitors?

#2: Understand Your Client’s Needs

You have to tailor your message to your audience.

We highly recommend that you do your research before you hop on a call with a client and figure out ways you can help them.

This can significantly increase your chances of having a successful call since it helps you:

  • See precisely how you can be a valuable asset
  • Better estimate the client’s budget
  • Get to know the client’s business

Your next step is to hook the price to the results you can bring. For instance, here is an example of how NOT to do it.

bad presentation of pricing

As you can see, your client is paying for logos, social media posts, etc. Now compare it to this one:

hooking price to results

In this example, your client is paying for DOUBLE their current following on social media, getting more impressions, and beating competitors with better designs. 

Of course, you shouldn’t scam people or promise results you can’t bring – this will only backfire and lead to a bad reputation. However, if you’re confident with your skills and you’ve previously achieved great results, you should definitely go for it.

#3: Be Firm, Yet Flexible

You have to be firm and stand your ground when it comes to your rates. However, this doesn’t mean that you can’t adjust to the client and the project. 

After all, the most important thing is not only to get paid, but also to enjoy what you do.

comparing two projects

Which project would you rather get?

The second one, for sure! Even though the price is a bit lower, It gives you a much better environment to work in, and allows you to finish your work while doing what you love.

(You’ll also be able to finish the work sooner, and move on to the next project.)

We’re not suggesting you lower your rates – just don’t be silly about them. If it’s only a little lower, but included with it is a bunch of great benefits, it’s definitely worth it.

#4: State a Specific Price, Not a Range

Offering a range to your potential clients suggests that you’re either indecisive, or desperate for a job – both of which are unappealing to the clients. That’s why we advise stating a specific number you want.

Here is an average freelance rate for graphic designers – around $30 an hour.

average freelance rate graphic designer

You can easily compare it with your rate to know whether you charge less, or just enough. Of course, if you’re very skilled, your rates will be much higher.

Not Sure What’s Your Hourly Rate?

It can be difficult to estimate the time it takes you to create a project and how much to charge for it, especially if you’re used to getting milestone payments.

But knowing how much your time is worth is critical, since knowing this will help you to:

  • Stop selling yourself short
  • Look more professional (you won’t hesitate when a client asks about it)

We’re going to use Atarim’s time-tracking feature to help you figure out your hourly rate. To start tracking time, we need to head over to the Dashboard Inbox, or Boards.

Atarim inbox

Once you have found a task you would like to track time on, you can click the “Add Timer” button in the attributes of the task.

add timer to a task

This will add this task to your “Active Timers” in the bottom left of the screen. This only becomes visible if you have one or more tasks added.

running timer in Atarim

To add another task to the active timers, we can click on another task and hit the “Add Timer” button.

► Note: You can only have one timer running at any given time.

active timer

That’s it.

Now you just have to calculate your hourly rate by dividing what you’re getting paid by the number of hours you spent.

This will ensure you won’t be selling yourself short when asked, “What’s your hourly rate?”

#5: Be Prepared to Walk Away

Not all clients will want to work with you for your rate.

There are some clients that can’t appreciate the quality and hard work you’re putting in the work you do – and they don’t deserve you!

Don’t downgrade yourself or try to please everyone for fear of not having enough money.

There are plenty of clients who are willing to pay your rate – or even higher. Just move on and find someone who will appreciate your hard work and pay you what you deserve.

What About Renegotiating Rates with Existing Clients?

If you’re selling yourself short, don’t worry, you’re not alone. Everyone has made this mistake at least once in their career, and most freelancers don’t even realize it. Fortunately, you’ve decided to change it, so what can you do about it?

The most important thing is to bind your increased rates to the value you provide. 

You need to show your clients that you can now bring much more money to the table than you did when you first negotiated the rate. Aside from money, you can also leverage newly obtained qualifications and experience.

Make it mutually beneficial – not just “I want a higher salary,” as most freelancers do.

Quick Tip: Be patient, and don’t renegotiate your rate after only a few weeks or months – it shows you’re there just for the money.

Conclusion – Stop Selling Yourself Short

Most freelancers lack negotiating skills, and work for pennies while being stuck in their careers, working with less-than-acceptable clients. The most common problem we see is not knowing what to charge, and trying to please every client as a result.

Here is the reality – some clients are there just to scam you. 

You can’t do anything about clients like that. They will only waste your time and money. Instead, find clients who value quality and want to make an impact.

The key aspect is knowing your rate so you don’t sell yourself short. 

And that’s exactly what our tool can help you achieve! 

Atarim is the leading visual collaboration platform trusted by 13,000+ agencies worldwide (web dev, design, and beyond), supporting project delivery for 1,200,000+ of their clients. Atarim’s groundbreaking platform can help you accurately find out your hourly rate and better organize your work. 

One of the unique and revolutionary features of Atarim is that it has been built on the foundation of point-and-click collaboration – allowing clients to point at what they’re referring to and then immediately leave feedback, say what needs to be changed, etc. 

Agencies, developers, and project managers use Atarim to eliminate the need to rely on guesswork and endless back-and-forth email communication. 

Try Atarim for free, figure out your hourly rate, and maximize your productivity now.

Should You Charge “Late Fees” For Invoice Payments?

Chasing payments is one of the least glamorous aspects of running a web design agency. In fact, small businesses spend 15 days every year chasing down late invoice payments. 

That’s why 17% of design agencies require some form of deposit or full payment before they begin work. 

Unfortunately, resolving payment issues is a rite of passage for web design agencies. The good news is you can resolve them with a late fee policy and good upfront communication. 

In this guide, we share exactly how to charge late fees and prevent missed payments. 

What Is a Late Fee Policy?

A late fee policy is a set of guidelines that outlines the penalties a client will face should they not pay their invoices on time. 

late fee policy in invoice

Think of it as a credit card company that charges interest when you don’t make monthly payments. 

Make sure you always include a late fee policy, the amount that will be charged, and any grace period provided within the original client agreement. 

You can choose to charge either:

  • A percentage of the overdue balance
  • A fixed amount. 

What Is the Standard Late Fee Charge?

There isn’t one single standard flat fee. However, many web design agencies charge between 1 to 2% in monthly interest, so staying near this range would be the optimal approach. 

how much to charge late fee

Let’s say a client was late on a $1,000 project. The first late payment would be $20 (based on a 2% monthly rate), while the second would be $40, and so on. Basically, each month your payment is late, you pay an extra 2% of the original amount.

How to Prevent Not Getting Paid in the First Place?

Not getting paid can leave a sour taste in your mouth. Nobody likes to get taken for granted, or mistreated. It’s bad business and can lower your confidence. 

If you want to prevent not getting paid in the first place, here’s what you can do. 

Take Upfront Payments

The best way to eliminate not getting paid is to force clients to take all the risk by making full, upfront payments for the project. 

In this case, the client pays you 100% of the negotiated fee before you begin any work. 

Here are a few tips to help you get a full upfront payment.

tips to ask customers for upfront payment

Source

It’s important to have a fixed scope that clients sign off on, so you and your clients know what to expect. If your clients are uncomfortable with paying the full amount before the start of the project, you can agree on a 50% deposit upfront, due when the contract is signed. 

Typically your contract should state that you have the right to hold the work until the balance is paid. 

Break the Project Fee Into Milestone Payments 

Earning trust can be difficult, especially in the beginning stages of a client relationship. You can take this a step further by asking for milestone payments. 

This is effective for longer projects such as an entire website rebuild that may take up to six months. 

design project milestones

Source

You can negotiate an initial deposit, and split-up remainder payments at certain pre-defined milestones. 

Set Up Autopay or Have Their Card on File 

We asked a few professionals with hands-on experience in the industry about how to prevent getting late payments, or not getting paid at all.

The majority of them suggested an autopay arrangement as the best solution.

what is autopay

It’s important you get a card on file upon signing the agreement. Then, agree on charging their card in line with deliverables or milestones. This is a fair way to ensure you’re paid. 

And if the card declines, you can withhold delivering the project or website until payment is made. 

Many payment providers, such as Stripe, have a Save Card feature that lets you store your client’s credit card information for future use. 

Of course, to prevent any data leaks and keep your client’s credit card information safe, you must bear in mind the local laws regarding data compliance, and uphold Payment Card Industry Data Security Standard (PCI DSS) compliance. 

store clients credit card

This approach is certainly more convenient than waiting for the client to manually send payments on their end.

How to Charge Late Fees 

82% of small businesses have cash flow problems. It’s a major reason why businesses fail. 

reasons small businesses fail

Source

You can fix this by simply charging a late fee, ensuring you always get paid on time. Here are essential tips on how to charge late fees in the best and most effective way possible. 

#1: Do Your Research

While late fees may not seem like a big deal, they can have a highly positive effect on your business. 

Agencies tend to get paid more promptly when a late fee policy is included in their contract. Also, it shows you’re a professional business that takes your work seriously. 

However, you can’t charge late fees as you want…

There are laws in place that may place a ceiling on how much you can charge for your late fees. 

Many states in the U.S. do not have any maximum late fees or grace periods. But it’s important to check since it varies by state. 

Here are a few notable states to be aware of: 

  • D.C. – 5% per month and 5-day grace period 
  • Florida – Maximum 5% and 15-day grace period 
  • New York – $50 or 5% per month max late fee and 5-day grace period 
  • Oregon – Maximum 5% per month 
  • Tennessee – Maximum $30 or 10% per month and 5-day grace period 

In the United Kingdom the law is that for business to business transactions you can charge statutory interest, which is 8% plus the Bank of England base rate. So if you were owed £1,000, and the Bank of England base rate was 0.5%, you would calculate the interest as £1,000 x (8% + 0.5%), which is £85. You would then need to divide this by 365 to calculate the daily rate of statutory interest.

#2: Add Your Late Policy to Your Invoice Payment Terms

Including a late fee policy in your invoice payment terms is imperative. Without it, you can’t legally charge any late fees. This gives you the legal authority to pursue invoice payments and add on a fee. 

The best way to word it is to keep it simple and easy to read, eliminating any confusion.

Here’s how you can phrase it: 

late fee policy example

If a customer is late paying an invoice, you can then follow up with a late fee letter. This letter needs to be polite, accurate, and helpful. It should also be based precisely on the terms included with the original invoice.

Make sure to consult your attorney so your client’s contracts comply with local and country regulations. This protects you in the case of disputes that may occur down the line. 

#3: Notify Clients Ahead of Time

For existing clients, you need to keep them in the loop about any changes you’ve made to the terms. Never blindside your client with a fee that wasn’t previously mentioned. 

Instead, let them know about the change so they aren’t caught off guard. 

Discuss the late fee policy with all clients before the contract is signed to ensure they understand the ramifications of late payments. 

#4: Send Invoices Promptly

It’s always good to send your invoices promptly, along with the final work. Sending it when the project is fresh in their mind increases the likelihood your client processes the payment right away – but never leave this to chance. 

Invoicing should be automated using cloud-based accounting software.

automate invoicing

Source

Also, sending the invoice promptly gives your clients enough time to pay. When sending your invoices, make sure you make it crystal clear what clients are paying for, such as: 

  • Hours spent (if necessary)
  • Distinct project numbers for deliverables such as (X web pages, etc.) 
  • Cost of materials
  • Consultation time

#5: Follow Up Immediately on Late Payments

Many invoicing software tools can send out reminders for the due date. 

However, sometimes those get quickly ignored. In that case, you can write a personalized and polite email reminder mentioning that perhaps your invoice has gotten lost in the shuffle.

follow up on late payment

That should be enough to jog their memory; however, you should also include the invoice number along with the project details. 

Here’s a template you can use for payment reminders: 

payment reminder email template

#6: Send a Revised Invoice

When your client fails to pay on time, it’s best to send them a revised invoice. After each month, you can create an updated invoice that includes all the late fees added to the total. 

You can include a note that reminds customers that the payment is overdue.


Subject line: [Company Name – Invoice Number] Regarding Your Overdue Payment

Dear [Name],

I am sending you this email because I noticed an overdue payment issue.

According to my records, the payment for invoice No. [Invoice Number] is X days overdue. The payment was due on [Date]. Could you please let me know when to expect proof of payment for this?

Kind regards,

[Name]


…and warn them that another late fee will be added if they don’t pay within the given time frame. 

#7: If Necessary, Escalate the Issue

54% of workers of freelancers complain that it takes too long to get paid. 

If the issue prolongs and there doesn’t seem to be any traction on the client’s end to resolve this payment issue, it may be time to seek legal help. 

If this is the case, then you can send a letter of demand, which serves as official documentation requesting payment. 

Dear [Mr/Ms Surname of Debtor],

We regret to note that despite previous letters the above balance is still outstanding. Unless you contact us within 48 to agree payment:

  1. We will commence our legal Debt Collection Procedure against you and place the matter in the hands of our solicitors to issue legal proceedings against you for the full amount overdue, including interest and legal costs.
  2. In the event that judgment is entered against you in those proceedings, we will register the judgment and publish it in all relevant trade journals.

Yours faithfully,

Tired Agency Owner

For some clients, this is serious enough to motivate them to make a payment. However, there are a few options to pursue further action if they ignore even this letter: 

  1. Hire a lawyer. The lawyer can file a lawsuit on your behalf to recover the payment, legal fees, and other damages incurred by the agency. 
  2. Hand over the case to a collection agency. Collection agencies will help get your money back and take a small portion of the invoices they successfully recover. 
  3. A small claims court. This is a venue designed to help businesses resolve any disputes over small amounts of money, however, this can only be done for local clients.

Conclusion – Consider Using a Late Fee Policy to Your Advantage

Having an unstable revenue stream due to unpaid invoices can have a detrimental impact on your business – in some extreme cases, it may lead to bankruptcy. That’s why it’s essential to protect yourself and make sure your customers and clients pay you on time.

One way to achieve this is to leverage a late fee policy and add it to your invoices.

It will encourage your clients to pay you on time, since they will be charged extra for a missed or delayed invoice payment.

Another thing that can help is to use a project management tool like Atarim. 

Atarim is the leading visual collaboration platform trusted by 13,000+ agencies (web dev, design, and beyond) worldwide supporting project delivery for 1,200,000+ clients. We help you redefine how you work with your clients and team to eliminate client delays and enjoy delivering projects in weeks instead of months. 

Agencies, developers, and project managers use Atarim to stop relying on guesswork and collaborate with clients directly, so they can see what’s going on all the time. This helps your clients to see all the hard work your team is putting into their project – encouraging them to pay you for your efforts.

Try Atarim for free, keep your team and clients on the same page, and prevent late or unpaid invoices.

What Is Milestone Billing & When Should You Use It?

Milestone billing is super-useful for encouraging both parties to move a project forward, and make payments more manageable for clients – as they can space them out over the course of the project.

It can also help you prevent scope creep and running over budget. This isn’t rare – such problems occur more often than you might think.

Source: Business2Community

Milestone billing can be a solution to these problems!

In this post, you’ll learn how to prevent these issues and create a seamless milestone billing process for your next projects.

What Is Milestone Billing?

Milestone billing divides the process of billing your clients into smaller steps. You can see an example of that below.

Source: Big Picture

You usually get paid after completing each milestone.

Project Billing vs. Milestone Billing

Project billing refers to billing after the whole project has been completed. There are no sub-goals or smaller steps. 

Of course, you can get some money upfront as well – usually 50%.

What Are the Benefits of Milestone Billing?

Milestone billing has a lot of benefits that make it more secure and manageable for you and your clients compared to project billing.

Here are some of our favorite benefits of milestone billing.

Get Cash in Hand Faster

You no longer have to worry about whether you’ll get paid – or when.

The same goes for your clients; milestone billing eliminates uncertainty, and helps both parties stay secure. Plus, you won’t need to wait for months to get paid since it can take a very long time to finish some projects.

Instead, you’ll get paid periodically as you work on the project.

Good for Clients Who Like to Be in Control and Want More Say

Feedback and changes in design projects are inevitable. However, if you stick to project billing, then you’ll need to make the edits after the whole project is completed (which is a huge pain in the neck). 

Fortunately, milestone billing eliminates this problem by helping your clients see how you progress by looking at each agreed project milestone – allowing them to jump in, suggest changes, and give you an opportunity to apply them as you work on the project.

This is much more effective than re-doing large parts of the existing project.

Good for Repeat Customers You Trust

Even for customers you’ve worked with previously, and with whom you have a positive relationship, milestone-based billing can be a real advantage. With such clients, you know that you’ll get paid even if you go with project-based billing; however, milestone billing will help you get cash in your hands faster, allowing you to have a more consistent cash flow.

Of course, with previous clients with whom you have a good relationship, there can sometimes still be the risk of project creep. A friendly, possibly ‘informal’ relationship can easily lend itself to clients asking for ‘just one more thing’, or ‘just a few changes’. While this may not be a huge problem, these small extras can easily add up, and if they appear at the end of a project it could delay you being able to start work on another client’s project. For this reason, milestone billing negates this risk, allowing you to plan for the longer term much more effectively.

How to Effectively Apply Milestone Billing to Your Business

Milestone billing is a great way to get paid faster and stay secure. 

But there are a few things you have to be on the lookout for to properly organize projects and avoid scope creep – working on additional things without getting paid.

#1: Identify Project Milestones

The first step is dividing your project into smaller steps or sub-goals. The best way to go about this is to reverse-engineer the project. You start with the finished project in mind and work your way back.

If you’re giving estimates on timelines/schedules, base this on experience in past projects. 

Set out the timeline for the overall project so you know when you will have the capacity for more work – this is crucial for you to plan properly. Divide the project into milestones (also tied to payment terms). 

Source: eDrawMind

The best approach with milestone billing is to be as transparent as possible and define your delivery estimates at the start. Before you begin the project, you should know how many resources will be allocated, any tools required, and any content or deliverables that you’ll need from the client. Factor all of this into your project estimate. 

#2: Create a Milestone Structure

The next step is to put all this planning into action and organize it into easy-to-follow steps. We’ll be using Atarim (naturally!), since it is the best tool for project management and collaboration on visual projects (obviously!)

Head over to the Projects tab in Atarim and add a new project.

After that, it’s time to set the milestones you’ve researched and agreed upon with a client. You can set the milestone title and date.

You’ll then head over to the Boards tab and create tasks you need to finish to complete each milestone – add the date, assignee, and urgency for each task. 

For instance, for our first milestone, creating a logo, we need to complete these.

Creating tasks is essential to prevent scope creep. Minor changes are acceptable, but if it takes too much time, you shouldn’t let it slip.

Of course, some projects are unpredictable and it can be difficult to pinpoint precisely what you’re going to do. For these instances, it can make sense to have a limit in the contract on the number of hours after which overages are charged at a standard rate. 

This makes scope creep seen as a positive thing, to allow you to do what the client wants, (and make more money, rather than losing it). 

#3: Collaborate with Clients & Get Paid

This step will help you a lot with:

  • Saving time on client post-project feedback
  • Improving client satisfaction
  • Finishing projects faster

Atarim gives you an opportunity to keep the whole conversation and feedback in one place. The first step is inviting clients into your workspace.

Head over to the Invite Users section in Atarim.

You will then need to add the users you invited to the project.

After that, you and your client can collaborate with our point-and-click collaboration – allowing clients to point at what they’re referring to and immediately leave feedback, say what needs to be changed, etc. 

This eliminates the need to rely on guesswork and endless back-and-forth emails – and keeps everything organized, preventing any unpredictable re-dos.

Are You Undercharging Your Services?

It can be difficult to estimate the time it takes you to create a project and, therefore, how much you should charge for it.

But knowing how much your time is worth is critical because It will help you:

  • Stop selling yourself short
  • Look more professional (you won’t hesitate when a client asks about it)

We’re going to use Atarim’s time-tracking feature to help you figure out your rate.

To start tracking time, we need to head over to the Dashboard Inbox or Boards.

Once you have found a task you would like to track time on, you can click the “Add Timer” button in the “Task Attributes” section.

This will add this task to your “Active Timers” in the bottom left of the screen. This only becomes visible if you have one or more tasks added.

To add another task to the active timers, we can click on another task and hit the “Add Timer” button.

You can only have one timer running at any given time.

After Action Report – Apply Milestone Billing to Your Services the Proper Way

Milestone billing can be superior to project billing if used properly. It can allow you to get cash in your hands faster, and gives your client more say in the process. However, it isn’t perfect, and you must be careful about the scope creep, unpredictables, and undercharging of your services.

And that’s exactly what our tool can help you achieve! 

Atarim can help you create milestones in seconds, add tasks with urgency and deadlines so you know precisely what to work on, and keep everything organized. With our time tracking feature, you’ll know exactly how long each task took, so you can discover your rates and prevent selling yourself short.

Also, you can leverage the point-and-click collaboration to allow clients to point at what they’re referring to and immediately leave feedback, say what needs to be changed, and so much more. 

If you want to eliminate all issues with milestone-based projects such as scope creep, running over budget, or poor planning, give Atarim a shot for free now.

  • Integrated into the leading visual collaboration platform trusted by 13,000+ agencies (web dev, design, and beyond) worldwide.
  • Supporting project delivery for 1,200,000+ of their clients and stakeholders.
  • Deliver projects in weeks instead of months.