

Project Kickoff Meeting: How to Run Wildly Successful Kickoff Meetings

Coffee, excitement, and a clear roadmap. No, it’s not our latest recommendation for a killer roadtrip – it’s the ingredients for a successful kickoff meeting.

It’s sometimes hard to remember the days before GPS, before Google Maps… before the internet, even. Back when you put your ten years at Origami School to good use in unfolding and refolding a paper map roughly the size of Texas.

Today we take easy GPS systems almost for granted, but without them we’d be… well, lost. Literally.

But whether you’re trying to work out how to get to a physical location, or a less tangible goal such as the successful completion of a design project, preparation is key. And with web design, that all starts with a kickoff meeting.

A kickoff meeting is the proverbial ‘starting pistol’ that gets things going. But let’s face it, kickoff meetings can often feel like a corporate version of speed dating: lots of introductions, heaps of information, and a whirlwind of expectations.

But here’s the twist – in the fast-paced and ever-changing world of web design, these meetings aren’t just a formality – they’re the cornerstone of success.

So, why are these meetings more than just a calendar placeholder? In the world of web design, where creativity meets code, a kickoff meeting is the first brushstroke on a blank canvas. It’s where visions align, strategies form, and, importantly, where coffee meets keyboard.

Whether it’s agreeing on the latest UX trends or debating the merits of different JavaScript frameworks, the kickoff meeting sets the tone for the entire project.

In this guide, we’ll navigate the do’s and don’ts, the how’s and why’s, and even the what-if’s of running wildly successful kickoff meetings.

Buckle up – it’s time to transform these meetings from mundane to magical, ensuring your next web design project is not just good, but legendary.

Types of Kickoff Meetings

Just as maps come in all shapes and sizes, from maps to help you work your way around large buildings, to maps you’d use to travel across the US, kickoff meetings come in different types too.

The two main types of kickoff meetings are internal and external. Internal meetings are those with your team, and external kickoff meetings are with clients and stakeholders.

Let’s take a closer look at each of these, to see what should be included, and what their purpose is.

Internal Kickoff Meetings

This is where your internal team meets up, including designers, developers, and project managers, and preferably all in person if possible (although for many agencies this won’t always be practical). If meeting in person, having plenty of coffee (and biscuits) is pretty much a necessity we feel.

These meetings should involve making sure everyone is aligned with the project, the journey, the milestones, and the specific strategies or considerations unique to that client or project.

Understanding the team dynamics, roles, collaboration arrangements, and planning for how challenges should be met will also be essential to cover.

In some cases the team will be very familiar with working with each other, but it may also be that you will be combining colleagues who haven’t worked together before, or even introducing new colleagues. Making everyone feel welcome, covering introductions, and helping to develop a positive group dynamic will be key to the success of the project.

The key elements to include in an internal kickoff meeting include:

  • Team Introductions: Where everyone gets to share a bit about their superpowers (read: skills) and their quirks.
  • Role Assignments: Like assigning the map reader, the navigator, and the lookouts, it’s about clarifying who does what.
  • Project Goals and Objectives: Setting the course with clear landmarks (project goals) to reach along the journey.

External Kickoff Meetings

Once your team is ready, it’s time to meet with clients for another kickoff meeting. External or client-facing kickoff meetings are the polished, shiny version of your internal gatherings. Here, you’re setting expectations, aligning on the deliverables, and ensuring that your team’s vision matches the client’s roadmap, including the specific project goals.

In these external kickoff meetings it’s essential to focus on:

Client Introductions: Understanding who’s who on the client’s side of things – who is the right person to contact for each aspect of the project, or each stage?

Project Deliverables and Scope: Clarifying the roadmap – what’s included and what’s not.

Communication Strategies: Establishing the lines of communication, including each person’s specific role, and the agreed method and frequency of communication.

Agile Project Kickoff Meetings

In the ever-evolving world of web design, Agile project kickoff meetings are a little like preparing for a voyage with multiple stops. These meetings are crucial for teams that operate in sprints (short, focused bursts of work).

While you won’t need a kickoff for every sprint, having one at the start of a major project phase or when welcoming a new crew member is like recalibrating your compass – essential for staying on course​.

Agile kickoffs focus on:

Sprint Goals: Identifying the immediate goals.

Team Dynamics and Processes: Ensuring everyone is in sync, on target, and understands the bigger picture.

Feedback and Adaptation Plans: Preparing to adjust the approach as project needs change or require.

As you navigate these different types of kickoff meetings, remember: the success of your web design journey depends very much on how well you prepare for and carry out these initial meetings.

Each type of meeting serves a distinct purpose in charting the course for a successful project.

Pre-Meeting Preparation

Before diving into a kickoff meeting, it’s crucial to make sure you’re fully prepared. Think of pre-meeting preparation as the mise-en-place of project management – everything needs to be chopped, prepped, and ready to go. This stage sets the stage for a productive and efficient meeting, making sure that your team’s time is well-spent, and that the meeting objectives are both clear and achievable.

Creating the Agenda

The agenda is your roadmap for the meeting. It’s not just a list of topics – it’s a strategic tool to guide the conversation and ensure that everything that needs to be covered is included. When creating your agenda, consider the following:

Objectives: Make sure you state clearly what it is you want to achieve by the end of the meeting. Is it alignment on project goals? Understanding of roles and responsibilities? Ensure these objectives are SMART: Specific, Measurable, Achievable, Relevant, and Time-bound.

Topics to Cover: List the key topics in order of importance. Should anything cause the meeting to be cut short, it’s important that the critical points have been covered first, allowing progress to be made before picking it up again in a subsequent meeting (not ideal, but we’ve all experienced technical glitches or unexpected client emergencies).

Time Allocation: Assign a realistic amount of time to each topic to help keep the meeting on track​

Inviting the Right People

Who attends a kickoff meeting can make or break its effectiveness. Include individuals who have a direct role in the project or have essential information or insights. This might include:

Internal Team Members: Those who will be working on the project directly.

Stakeholders: Anyone who has a vested interest in the project’s success.

Special Guests: Sometimes, bringing in an external expert or consultant can provide valuable insights​.

Setting the Objectives

The objectives of your kickoff meeting should be clear and shared with all participants ahead of time. This clarity helps attendees come prepared and contributes to a more focused and productive meeting. When setting objectives, remember:

Alignment with Project Goals: Ensure the meeting’s objectives align with the overall project goals.

Action-Oriented: Each objective should drive the project forward, setting the stage for what comes next.

Understandable and Concise: Avoid jargon and keep the language simple. The goal is for everyone to leave the meeting with a clear understanding of what’s expected of them​

In summary, the pre-meeting preparation is where you set the tone for your kickoff. By carefully planning your agenda, inviting the right people, and setting clear objectives, you ensure that your meeting is not just another entry in everyone’s calendar but a launching pad for your project’s success. It’s the difference between a meeting that feels like a box-checking exercise and one that energizes and aligns the team for the exciting journey ahead.

EasyWP Review: Is It The Fastest & Most Affordable Hosting Provider?

EasyWP is a popular WordPress hosting provider, largely because it excels in some of the most important areas of user experience, such as:

  • Loading time. How fast your website loads (Data shows that if a website takes more than three seconds to load, 40% of visitors are likely to abandon it).
  • Uptime. How much time your website is accessible (although 100% is the goal, the industry considers 99.999% uptime to be an optimum achievement).

These metrics are critical since they will directly impact both your sales and revenue.

However, EasyWP isn’t necessarily the right choice for everyone’s needs.

We’ve personally tried EasyWP for a long time and decided to create this review to help you decide whether it’s the right solution for you.

Let’s jump in!

What Is EasyWP?

EasyWP is a fully managed hosting for WordPress offered by Namecheap.

This managed hosting platform has been created largely for beginners, with almost every technical aspect handled by their team, including caching, SSL, CDN, and backups.

EasyWP homepage

EasyWP vs. Competitors: How Does It Compare?

EasyWP shines in various key metrics for hosting providers such as:

  • Website load time
  • Uptime
  • Security
  • Pricing

To help you better understand why these metrics matter, we’re going to take a deep dive into each one of them to show you exactly how EasyWP compares to its competitors.

EasyWP Website Load Time

The load time of your site is one of the most critical factors for capturing customers and minimizing the bounce rate.

In fact, it takes as little as a one-second delay to see a drop in sales.

one-second delay can lead to a drop in sales

Source: Online Trouble Shooters

If you choose EasyWP, you won’t be disappointed in this area.

This is because EasyWP is the fastest managed WordPress hosting provider, compared to Bluehost, GoDaddy, WP Engine, and Kinsta – all of which you can see in a table below.

Fully Loaded TimeTime to First Byte
EasyWP0.7 seconds192 milliseconds
Bluehost0.8 seconds396 milliseconds
GoDaddy0.8 seconds200 milliseconds
WP Engine0.9 seconds245 milliseconds
Kinsta1.29 seconds491 milliseconds

EasyWP Website Uptime

It doesn’t matter how great your website is, if you can’t keep it live and accessible by searchers, you won’t make any sales. Uptime is a metric that describes the percentage of time when your website can be accessed (i.e., your server is not down).

And EasyWP did not let us down! They were able to provide us with 99.9% uptime – which is what the best web hosting providers strive to provide.

EasyWP reliability always live

But, since they care about reliability, they’ve pushed their uptime game even further.

If you are on their Supersonic hosting plan, you get an uptime guarantee. This means that if your website has been up for less than 99.99%, they will refund one day of service for each hour the server has been down below this limit.

EasyWP Website Security

Security should be among your top priorities. If your website won’t be secured, you might not get optimal results, and even face data leaks or legal issues.

The most common type of website security is an SSL certificate which encrypts the data of your website – so even if someone gets unauthorized access to your data, they won’t be able to do anything with it.

How SSL certificate works

Source: Norton

All modern hosting providers offer SSL certificates – and EasyWP offers this too.

However, to get an SSL certificate, you will have to hop on to either their Turbo or Supersonic paid plan, starting at $12.88 a month.

EasyWP Hosting Price Plans

You might be surprised, but EasyWP is one of the most affordable hosting providers. Here is how EasyWP compares with other popular hosting providers.

EasyWP StarterGoDaddyWP Engine
Storage10 GB30 GB10 GB
Pageviews50kLimited at 25kLimited at 25k
Price$6.88/mo$12.99/mo$30.00/mo

As you can see, EasyWP is a clear winner with both its services and pricing.

And as EasyWP offers a FREE trial you can try it out for 30 days, risk free!

Plus, you can also regularly get discounts, great deals, and better offers you can use to save even more money on your hosting.

EasyWP Website Load Handling

Load handling is how well your hosting can handle the spikes in traffic on your website. Unfortunately, this is the area where EasyWP didn’t shine quite as much. In 2023, there was a test run by HostingStep in which they monitored the load-handling ability of the EasyWP hosting service by sending 1,000 visitors simultaneously to an EasyWP hosted website.

EasyWP Website Load Handling

The results showed an average 839 ms response time across 1,000 clients within the 1-minute test.

If you anticipate experiencing traffic spikes (such as when promoting seasonal deals at Christmas), you might want to consider looking for an alternative.

Key Features & Benefits

There are additional features that EasyWP (and almost every hosting provider) offers that you might not be aware of. And that’s what we’ll cover in this section.

EasyWP Caching  Capabilities

Caching makes your website load faster by storing the website with all of its data in the user’s cache (a small memory in a web browser) instead of fetching it every time from the server.

EasyWP Caching  Capabilities

Source: KeyCDN

EasyWP offers advanced caching capabilities. However, even though they offer their own caching services, we recommend going with their third-party caching integrations – Varnish, OPCache, and Redis Object Cache. This is because their caching is very limited. 

In fact, there are no options to fine-tune or uninstall their cache plugins. All you can do is clear the cache.

Thinking About Using W3 Total Cache, WP Rocket, WP Super Cache, etc?

Unfortunately, all of these caching plugins interfere with EasyWP hosting – and they are blocked by default.

Learn more about all EasyWP blocked plugins.

EasyWP Data Centres

EasyWP has only one data center (in the whole world) which is located in Phoenix, Arizona in the US.

And while it does a pretty good job of loading your website for US users, you might experience a bit of a delay for non-US searchers. That’s why it’s always a big advantage to have multiple data centers across the world.

EasyWP Backups

EasyWP does NOT create automatic backups for you.

However, you can do them manually at any time you want. Downloading or restoring them is possible with just a single click.

EasyWP Backups

EasyWP Domains

You can use domains from any domain name registrar (unlike in the past, where you could only access Namecheap registered domains). Although there are no FREE domains with EasyWP, you might want to take advantage of their temporary domain feature. This is great for previewing your WordPress website without actually connecting a domain.

EasyWP Content Delivery Network

A content delivery network (CDN) is a network of servers that caches your data. This speeds up the delivery of web content around the globe.

EasyWP Content Delivery Network

Source: Leaseweb

EasyWP provides free access to Namecheap’s Content Delivery Network. You can use this easily with a Namecheap-registered domain, and with any 3rd party registered domain name if you point the nameservers to FreeDNS.

EasyWP Email Hosting

EasyWP does NOT support email hosting by default.

However, It comes as an add-on feature that you can purchase for $1.14 a month, although if you sign up for a Namecheap Shared Hosting plan, you will get the email service for FREE.

But as EasyWP customers get a 50% discount on any email hosting plan for the first year, this means that they can get email hosting for as low as $0.62/month!

Namecheap Shared Hosting plan pricing

How To Set Up EasyWP

The whole process of setting up EasyWP is extremely easy.

In this section, we’ll show you the step-by-step process of setting up EasyWP hosting and creating a new website.

#1: Create an Account / Log In

Start by heading over to Namecheap and choose your preferred plan.

Once you’ve registered and selected your plan, sign in to access your EasyWP dashboard.

Namecheap create a new account

#2: Create a New Website

Click on the ‘+ New Website’ button and create it.

EasyWP Create a New Website

You will need to fill in a name for your website and a brief description of what you want to do with it – whether it’s a website for business, ecommerce, a blog, or other categories you can see in the image below.

Note: You are able to change the website name later.

EasyWP name your website

#3: Choose Your Plan

Before you can continue, you will have to choose your plan.

You have three options, depending on your needs. If you are just a beginner, you can hop on their Starter plan, which costs just $2.91 per month, if paying annually..

They’re also currently offering the first month free.

EasyWP monthly plan

It’s definitely worth checking their yearly subscriptions – they have very tempting discounts.

yearly plan EasyWP

#4: Choose a Domain Name 

You can now choose the domain name for your website. You have three options:

  • Domain from EasyWP. You can use this one for FREE as a temporary domain to try out their services.
  • Your domain on Namecheap.
  • A domain from another provider.
EasyWP Choose a Domain Name

#5: Complete the Setup & Payment

In this step, you can choose which themes and plugins you want to install.

EasyWP choose which themes and plugins you want to install

There is a good selection of popular plugins you can choose from.

EasyWP choose plugins to install

After that, you will review your cart and pay for the services you have selected. They offer all standard payment methods, including PayPal.

EasyWP review your cart and pay for the services

#6: EasyWP Dashboard

After payment, you will be automatically redirected to the Dashboard. To access your WordPress admin, click on the ‘Admin’ icon at the top-right corner.

EasyWP Dashboard

That’s it, you’re all set!

EasyWP Pricing

EasyWP is the true, affordable WordPress hosting solution for everyone. It offers multiple plans and options you can choose from.

And you can always switch between memberships according to your changing needs.

EasyWP pricing

We also recommend checking their yearly plans since you can save as much as 40%.

Ready to Create a New WordPress Website?

EasyWP is a popular hosting provider, particularly suitable for beginner and non-technical users.

It does a great job with its unmatchable speed, 99.99% uptime guarantee, and affordable prices that suit everyone.

Looking to learn more about hosting, similar tools, or WordPress? Check out these recommended resources:

If you’re looking for a fast and reliable hosting provider which is affordable, you should definitely give EasyWP a shot right now.

The Best WordPress Translation Plugins

Looking for the best WordPress translation plugins? Then you’re making a great decision to address the needs of the majority of active internet users.

With 1.13 billion websites on the internet and 5.3 billion internet users, what proportion of those websites would you guess are written primarily in just one language – English?

It might surprise you that 59% of all websites are English-based, with Russian in second place with 5.3% of websites, and sites written in Spanish coming in third place with 4.3%.

But to cater only to English-speaking visitors is to ignore three-quarters of all internet users since only 25.9% of internet users list English as their native language.

This demonstrates a very real discrepancy between what is needed and what is delivered.

If you have a WordPress-based website, then installing a translation plugin is not only helping your site meet the needs of a vastly wider audience but is also setting you apart from many of your competitors.

After all, if you can’t communicate with your potential customers, you’re unlikely to close a sale.

Since you’re clearly considerate enough to have already considered the needs of your potential customers, you’ve probably already thought of ways to achieve this.

Hiring professional translators might be an option you’ve considered, but this usually comes with a hefty price tag.

Using a tool such as Google Translate may be another option you’ve looked at, but there have been many examples of where this has failed to work properly – and put people off.

Google Translate Tweet translation

Easily, the best option if you have a WordPress website is to use one of the most established, reliable, and highly rated translation plugins available – but which one?

In this article, we’ve done the research, saving you even more time. Read on to discover what the best WordPress translation plugins are today, and which one you should use to make sure you’re reaching that other 74.1% of internet users.


Choosing The Right Plugin For You

When looking for a translation plugin, you should be clear on what your expectations are. 

In our experience, a few seconds of planning will spare you from the horror of reinstalling and endless testing.

  • Do you want to add translations manually? 
  • Would you like to have the luxury of a free trial? 
  • Does your plugin support the languages you require?

You may have tens of solid WordPress plugins running on your website without difficulty, but adding a single poorly built plugin might slow it down, or worse.

We have only selected plugins from established developers with a good track record of regular maintenance and updates. Therefore our picks should work reliably with other elements of your website. 

Let’s get started!

#1: Weglot Translate – High-Quality Website Translations

Weglot Translate

Weglot Translate is a featherweight WordPress translation plugin with access to 100+ translation languages. You can also easily hire an expert translator through the Weglot Dashboard.

Weglot

Got an ecommerce store? Weglot is able to translate WooCommerce product pages and checkout processes, and is trusted by over 70,000 businesses.

The free trial includes one language and 2,000 words so you can see how the plugin works for yourself. Following that, their pricing options run from 10,000 to 1,000,000 words per year, with a maximum of ten translated languages.

Pricing: Free, with paid versions range from $17-$769 per month.

Key Features:

  • Fully compatible with WordPress themes and plugins, including WooCommerce and Elementor.
  • Optimized for SEO
  • Detects all the content on your website.
  • The translations are updated in real-time, so there is no need for maintenance.
  • Translations are made by the best machine learning software available.
  • Assign specific translation tasks to either team members or Weglot’s professional translators.

Visit the Weglot plugin page for the full list of features.

Weglot has an average rating of 4.8 out of 5 stars from 1,592 reviews on WordPress.org.

Pros:

  • Automatic workflow: any new content is automatically detected and translated.
  • Edit translations: use post-editing tools, add your own translators, or order professional translation from directly within the plugin.
  • No need for separate websites: Weglot creates subdomains for the different language versions of your website.
  • Auto-redirection: automatically serve pages in your visitors’ own language based on their browser settings.

Cons:

  • The free version is only 2,000 words.

#2: GTranslate – Best for Fast and Simple Translations

GTranslate

GTranslate is one of the most popular WordPress translation plugins, with over 500,000 installations. If you want to translate your website into over 100 languages with Google’s automatic machine translation, this is the right assistant!

It can translate websites on the go and automatically set the language based on the language preference in the user’s browser.

GTranslate automatically set the language

GTranslate has been a leading translation plugin since 2008.

It features a very straightforward setup, simple interface, and exceptional customer support. You can use it for free, but if you want additional features such as full SEO compatibility, you will need to go for the paid version.

Pricing: A free version is available. Paid plans start at $9.99 per month.

Key Features:

  • 103 available languages.
  • Free Google automatic machine translation.
  • Can be integrated with Google Analytics.
  • Automatically sets language based on the language defined in the user’s browser.
  • WooCommerce shop translation feature.
  • Translates menus, widgets, themes, and plugins.
  • Translate websites on the fly.

GTranslate has been rated 4.9 out of 5 stars from 3,678 reviews. Many reviews mention helpful and responsive support.

Pros:

  • Plugin has been running since 2008.
  • Simple set up.
  • Friendly user interface.
  • Excellent support.
  • Fully SEO compatible (for paid versions)

Cons:

  • Many of the best features are only available in the paid plan.

#3: TranslatePress – An Excellent Alternative to GTranslate

TranslatePress

TranslatePress and GTranslate are very similar, allowing you to use either manual or automatic website translation methods. The automatic translations are carried out by Google Translate, although this feature is not available in the free version.

TranslatePress has a great feature that allows you to translate your website from the front end and get a live preview of your translation while modifying it. 

translate your website from the front end and get a live preview

You can also put the language switcher anywhere on your website, making it easier for visitors to switch to their favorite language.

TranslatePress can also automatically detect the user’s country by their IP address.

method of language detection

Pricing: Free. Pro plan starts at $8.77 per month per site (billed annually at $97.64)

Key Features:

  • Translate your entire website from the front end.
  • Live preview of your translated pages while editing them.
  • Manual or automatic translation.
  • Integrates with Google Translate for automatic translation.
  • Adjustable positions for language switchers using shortcodes, adding a menu item, or a floating dropdown.
  • Exclude certain content from being translated.
  • Compatible with WooCommerce.

TranslatePress was rated 4.7 out of 5 stars from 1,210 reviews on WordPress.org.

Pros:

  • Quick and easy to use – edit your website from the front end.
  • Detect the user’s country by their IP address for automatic translation
  • Great support.

Cons:

  • Some important features, such as automatic translation, are only available in the paid version.

#4: Polylang – Best for Manual Translation

Polylang WordPress plugin

The plugins mentioned previously all carry out translations automatically. Polylang is more aimed at website owners who want to translate their websites manually.

Pricing: Free. Pro version is available for $108.60 per website.

Key Features:

  • Translate menus, widgets, pages, posts, categories, tags, custom post types, and taxonomies.
  • Customizable language switcher widget and navigation menu item.
  • Compatible with Yoast SEO.
  • You can share the same URL slugs across languages.
  • Integrates with WooCommerce via Polylang for WooCommerce plugin.
  • You can either set the language code in the URL or use a different subdomain for each language.

Polylang has an average rating of 4.7 out of 5 stars from 2,543 reviews on WordPress.org.

Pros:

  • Simple to use for manual translation.
  • You can add as many languages as you want.
  • Language switcher is an easy way for your visitors to switch to their preferred language.

Cons:

  • Doesn’t automatically translate your website.

Conclusion – What’s The Best Translation Plugin?

There isn’t any single “best” translation plugin.

It all depends on your preferences, needs, and how large your website is. However, Weglot is widely recognised as one of the most versatile and reliable services as it combines automatic translation services with professional translations carried out by real people.

If you’re still not sure which plugin to use, we’d recommend starting with Weglot – that’s why we put it at the top of our list of WordPress translation plugins.

Want to learn about more useful tools? Check these resources:

If you are going to use Weglot with a team of professional translators, then you’ll be assigning them tasks. This is, of course, something that will happen frequently within a digital agency, but can often be the primary cause of project delays.

Sending emails back and forth is inefficient, prone to misinterpretation, and can extend projects from days to weeks, or from weeks to months.

Which is where Atarim steps in.

With Atarim, you can leverage point-and-click collaboration to enable clients and stakeholders to point at what they’re referring to on any live web page, and immediately leave feedback, say what needs to be changed, and so much more. 

Plus, you can also create milestones, divide them into tasks, and monitor performance.

If you want to receive feedback that makes sense, make it easier to collaborate with clients, and finish projects in days instead of weeks, sign up to Atarim today – with paid plans from just $20 per month.

  • Integrated into the leading visual collaboration platform trusted by 13,000+ agencies (web dev, design, and beyond) worldwide.
  • Supporting project delivery for 1,200,000+ of their clients and stakeholders.
  • Deliver projects in days instead of weeks.

Designing for Colour Blindness

Color blindness affects 300+ million people worldwide, including some famous names such as Bill Clinton, Mark Zuckerberg, and Prince William.

Source: Venngage

But, contrary to popular belief, most color blind people don’t see a black and white world.

In fact there are four main types of color blindness, and within each of these there are many different degrees to which people may be affected. For anyone without color blindness it can be easy to assume that your wonderfully designed website, and your chosen color scheme, will be met with delight and admiration from everyone. However, for many people with color blindness your website may be a nightmare to navigate – possibly even impossible.For example, look at the image below. If your eyesight is normal, this will be a pretty clear image, with the text easily visible:

However, if we upload this to a color blindness simulator, this is what it will look like to someone who has red blindness (or ‘protanopia’) – the most common form of color blindness:

All of a sudden, your wonderfully clear buttons, menus, navigation, and web content becomes virtually impossible to see or to navigate.

Given that around 8% of the population is color blind, and 5.3 billion internet users, that means a potential 424 million people would be unable to see your website.

With 860,000 of the most-visited websites on the internet failing to meet color blindness accessibility requirements, this is a significant issue. And one which, if you make the effort to address it, will not only meet the needs of a very significant number of people, but will also make your website stand out for all the right reasons.

In this post, you’ll discover the exact steps to follow in order to create a color blind friendly design.

Let’s get hue started! (‘you’… ‘hue’..? Oh never mind, let’s just dive in!)

Quick Primer to Color Blindness 

Color blindness usually refers to the inability to see all colors properly. It’s very rare that a person doesn’t see any colors – living in a black-and-white world.Usually, color blind people just can’t see a whole color spectrum, as you can see below.

Source: All About Vision

Although it may seem like a rare condition, it affects 300 million people worldwide, and is  much more prevalent in men.

The Types of Color Blindness

There are different types of color blindness – some people have trouble seeing different colors than others.

Red-Green

People who are red-green blind are commonly surprised that peanut butter is not green.

Source: EnChroma

That’s right, red-green blindness makes it difficult for people to distinguish between red and green colors. There are four types of red-green color blindness:

  • Deuteranomaly
  • Protanomaly
  • Protanopia
  • Deuteranopia

Blue-Yellow

This is a less common color blindness type, which makes it difficult for the color blind person to distinguish between blue from green and yellow from red.

Source: ColorMax

Again, there are more types of blue-yellow color blindness.

  • Tritanomaly
  • Tritanopia

Complete Color Blindness

Complete color blindness means you see a black-and-white world. This is a very rare disorder, though, affecting only 1 in 33,000 people.

Source: Color Blindness

Take a Test: Are You Color Blind?

Since color blindness is common, it may be affecting you without you even realizing it.If you wonder whether you’re color blind, you can take a test by looking at the images below and writing down the numbers you see.

Source: Verywell Health

If you were able to read all of them, you’re not color blind. 

Write down the numbers into the comments below and let us know whether you’ve been able to see all of them.

How to Design for Color Blindness: 5 Essential Steps

To make your design accessible, you have to keep color blind people in mind, and make small adjustments, so they can get the most out of your design.

Also, very few designs are optimized for color-blind, so it’s an easy way to stand out.

#1 – Keep It Simple 

Having a simple palette and using few colors is the first step to accessible design.

Color blind people have a hard time recognizing colors, so using similar colors, especially in charts, can make these elements look the same. That’s why we recommend using only a few colors, and keep the design simple as well.

What To Do: 

  • Avoid cluttered or overly complex designs
  • Maintain a consistent design language
  • Establish a clear visual hierarchy

#2 – Use Patterns

Take a look at the chart below.

Source: Crux Collaborative

As you can see, it’s impossible to see it properly for color-blind people. That’s why we recommend using patterns such as lines, dots, and textures.If we were to add lines to the graph, it would look like this – readable for everyone.

Source: Crux Collaborative

What To Do: 

  • Incorporate a range of patterns to convey information
  • Be mindful of patterns that may overlap or blend together

#3 – Avoid Certain Color Combos

There is no specific set of colors to avoid that will suit everyone, since there are many types of color blindness.So, as a rule of thumb, we suggest using recommended color-blind palettes, which you can see below.

Source: David Nichols

If you don’t like any of them, just try to stay away from these color combos:

  • Red & green
  • Blue & purple
  • Blue & gray
  • Green & brown
  • Green & blue
  • Green & black

What To Do: 

  • Avoid color combos that may be problematic
  • Provide alternatives to color combos such as text

#4 – Take Advantage of Contrast

Most color-blind individuals rely on contrast to distinguish certain colors.

The higher contrast ratio you add to your design, the better the readability for color blind people – and those with other vision impairments too.

Source: Shining

What To Do: 

  • Ensure high contrast between text and background color
  • Use contrast-checking tools to meet accessibility

#5 – Add Labels Whenever Possible

Labeling can be a game changer to the accessibility of your website.Adding labels to your design is especially useful with charts, products in different colors, or even sign-up/login forms.

Labels add the necessary information that color-blind people need. 

Plus, you’ll also be able to help people using screen readers to better understand your website and increase the chances of sale – 14% of respondents in a survey carried out by WebAIM stated that they rely on a screen reader, so this is another great way to meet an even wider audience.

What To Do: 

  • Use clear, descriptive labels for elements, buttons, and links
  • Use formatting to draw attention to important information

Simulate Color Blindness with Coblis

Coblis is a FREE tool for simulating different types of color blindness, so you can see whether your design is accessible.Hit the ‘Choose Image’ button, upload the image, and select the color blindness type.

As you can see, you can easily switch between different color blindness types to test your design, so you can ensure it’s accessible and readable.

Don’t Forget to Use Minimalism With Your Design

Having too much color and elements on your website is not optimal for color blind people.

You want to keep the number of colors and elements to the minimum, so you can steer the attention to where it’s supposed to be.You can see a great example of a minimalist website with our design:

Here’s what we recommend you do:

  • Simplify complex interfaces. Reduce unnecessary elements and focus on the core functionality. This reduces visual noise and makes it easier to navigate. 
  • Use negative space. Use negative/white space effectively to provide breathing room between elements, improving overall readability and usability.

Conclusion – Create Color-Blind Friendly Designs

Color blindness is pretty common, so if you’re looking to maximize your reach, it’s vital to keep designs accessible and readable to color blind individuals.

To learn more about design tips and tricks, check these resources:

Focussing on ensuring people can access your website visually underlines the importance of how we all work best when we can see the information. This applies to collaboration on websites too.

Atarim was designed for that specific reason – transforming collaboration from an endless series of back-and-forth emails and phone calls with vague descriptions to something visual that makes perfect sense – first time.

Imagine remote collaboration across teams or with clients that’s completely visual.

With Atarim, you can use simple point-and-click collaboration to enable clients to point at what they’re referring to on any live web page, and immediately leave feedback, say what needs to be changed, and so much more. 

If you want to receive feedback that makes sense, make it easier to collaborate with clients, and finish projects in days instead of weeks, sign up to Atarim today – with paid plans from just $20 per month.

  • Integrated into the leading visual collaboration platform trusted by 13,000+ agencies (web dev, design, and beyond) worldwide.
  • Supporting project delivery for 1,200,000+ of their clients and stakeholders.
  • Deliver projects in days instead of weeks.

What Makes a Good, Accessible, Easy to Read Font?

Be honest – which takes longest: writing the text, or choosing the font?

For the professional procrastinators amongst us, the overwhelming choice of fonts available today is enough to keep us busy until retirement! But it’s an essential part of any design project, and choosing the perfect font is a crucial task, one with long term implications.

Ultimately, the right font should be easy to read, accessible, and appealing.

However, having to choose from 200,000+ different fonts can be a daunting task – especially if you don’t know what to look out for.

fonts

Fortunately, we’re here to assist you with that.

In this article you’ll discover exactly what to look for when choosing a font for a design project (and what to avoid).

You’ll also learn precisely what makes a good, accessible, and easy to read font – and you’ll even walk away with our list of the top recommended fonts for your design work!

Let’s jump in!

Decoding the Serif vs. Sans Serif Dilemma

The Serif vs. Sans Serif dilemma revolves around the choice between fonts with or without decorative strokes at the ends of characters.

Here’s an example of both of them, so you can see the difference between the two.

serif vs sans serif fonts

Source: New England ReproGraphics

Both styles of font have their benefits, and recommended uses, so let’s explore what these are.

Using Sans Serif Fonts for Headings And Emphasis

Headings need to grab attention. They need to be eye-catching, and extremely easy to read and scan quickly.

It’s for this very reason that sans serif fonts were first developed, and as they have a much simpler structure, with no decorative strokes or flourishes, they do work better for titles, headings, and subheadings.

Popular sans serif fonts for headings include Helvetica, Futura, Verdana, Calibri, and Arial.

Improving Readability in Smaller Text With Serif Fonts

Although sans serif fonts are easily legible from even quite a distance away, when it comes to blocks of text, the simplicity and uniformness of the fonts can actually interfere with the readability.

Serif fonts provide much greater legibility for text that is written in a small font size, and when written as blocks of text (such as paragraphs, or columns).

Popular serif fonts for smaller text include Baskerville, Cambria, Garamond, and Times New Roman.

The Best Fonts for Desktop Websites

The best fonts for desktop readers should consist of these main qualities:

  • Readability and scalability. Fonts for desktop websites should be readable across different screen sizes and resolutions.
  • Device compatibility. The chosen fonts should be supported across various desktop browsers and operating systems.

In essence, these fonts should strike a balance between aesthetics, readability, and technical compatibility.

For these reasons, the safest fonts to use include:

Serif

  • Times New Roman
  • Georgia
  • Baskerville

Sans Serif

  • Arial
  • Helvetica
  • Roboto

The Best Fonts for Mobile Websites

Most of the traffic on the internet today comes from mobile devices – with 64% of all searches being conducted on smartphones.

That’s why it’s vital to focus on providing the best mobile user experience.

more searches are on mobile than on desktop

When choosing fonts for mobile websites, you should keep these considerations in mind:

  • Readability on small screens. Prioritize fonts that have excellent readability on smaller screens. Sans serif fonts often perform better than serif fonts in such cases.
  • Responsive and scalable. Choose fonts that scale nicely across different mobile devices and screen orientations.
  • Clear and crisp appearance. Pick fonts that are easy on the eyes even with quick glances (since many mobile readers are on the go).

We would recommend choosing mobile-friendly web fonts, such as these sans serif fonts recommended by services such as Google Fonts, which are designed for mobile compatibility and fast loading times:

  • Arial
  • Helvetica Neue
  • Roboto
  • Nunito

Note: We left out serif fonts deliberately, because the decorative strokes (‘serifs’) can make them difficult to read on smaller devices.

Can Screen Readers Have Trouble With Some Fonts?

Yes, in fact they can!

Some fonts are the very opposite of accessible, and may prevent screen readers from being able to vocalize the text.

some fonts can prevent screen readers from vocalizing text

Although all common letters and symbols appear on your keyboard, and are therefore encoded using a system known as ASCII, this system can only support up to either 128 or 256 different types of characters.

An alternative character encoding system known as Unicode can support up to 1,114,112 characters, including emojis, and characters from many different languages, as well as mathematical and scientific symbols.

Many screen readers cannot interpret many of these, and will either miss them out entirely, or replace them with the wrong letter or character, often resulting in verbalized text that makes no sense at all.

A recent survey by WebAIM showed that, of the people surveyed, 14% relied on a screen reader to access content online.

Can your business afford to ignore the needs of that many potential customers?

Here are a few other issues that can make it impossible for screen readers to read your text:

  • Complex decorations. Fonts with excessive decorations can confuse screen readers, since they may struggle to interpret them.
  • Poor spacing. Fonts with inadequate spacing between characters can make it difficult for screen readers to interpret the text.
  • Non-standard character shapes. Fonts that deviate significantly from standard letterforms might be challenging for screen readers.

While there are thousands of these out there, the most popular examples of fonts that are unreadable for screen readers include:

  • Vivaldi
  • Papyrus
  • Mistral
  • Brush Script
  • Ravie

Make sure to avoid these for the sake of accessibility.

Some Fonts May Have Issues When Translated

Some fonts can’t be translated into different languages.

If you do try to translate such fonts, you’ll usually encounter a font substitution – with another font replacing any unsupported characters.

font substitution

This looks unappealing and very unprofessional.

Here are additional issues that can arise with fonts during translation:

  • Glyph variations. Fonts may lack support for certain characters or glyphs required in different languages or writing systems – so they won’t show properly. 
  • Character width and alignment. Fonts with varying character widths or inconsistent alignment might cause text to display differently when translated.
  • Script complexity. The translation might not fit well within the original design, leading to visual inconsistencies or legibility problems.

That’s why you should always test your fonts beforehand.

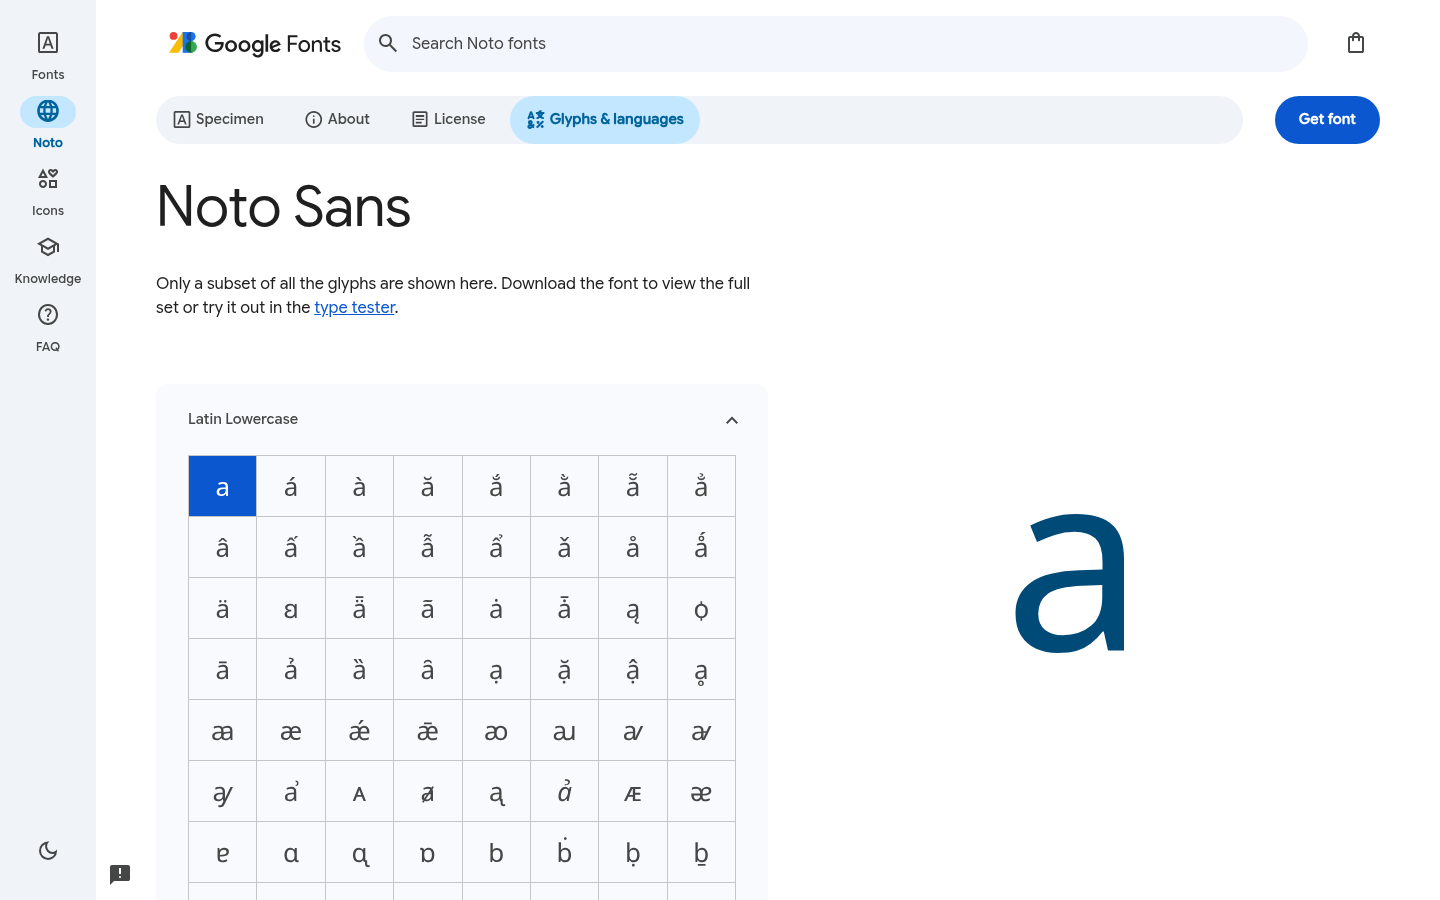
You can prevent this by looking at the supported characters of the font of your choice.

supported characters of fonts

Recommended fonts for content that may be translated include:

Serif

  • Arial
  • Times New Roman
  • Noto Sans

Sans Serif

  • Verdana
  • Georgia
  • Tahoma

Addressing the Needs of Dyslexic Visitors

Around 1 in 10 people are dyslexic.

With 5.3 billion people on the internet, that means that around 530 million people potentially browsing your website have dyslexia.

This is why it’s vital you ensure your website is readable to people who struggle with dyslexia. This starts by using fonts that enhance readability and minimize visual stress.

Here are a few tips that can help you choose the right fonts for such readers:

  • Open and clear letter forms. Fonts with clear distinctions between characters help reduce confusion. Letters such as ‘b’, ‘d’, ‘p’, and ‘q’ should be easily distinguishable.
  • Consistency. Fonts with consistent character shapes and minimal variation in letterforms enhance readability.
  • Sufficient spacing. Fonts with adequate spacing between characters and words improve legibility and reduce visual crowding.

Of course, there are some fonts you can use that are tailored specifically to dyslexic readers such as Open-Dyslexic, and if you want to make your site more accessible, we recommend looking into them!

open dyslexic fonts

For meeting the needs of your dyslexic visitors we would recommend:

Sans Serif

  • Dyslexie
  • OpenDyslexic
  • Lexie Readable

Note: Since readability is the #1 priority with dyslexic audiences, it’s recommended to use sans serif fonts such as Arial and Comic Sans since they don’t include decorative elements.

Conclusion – Make Your Site Accessible And Readable

The right fonts will make it very easy for your audience to consume your content – no matter whether they’re dyslexia or visually impaired. 

To learn more web design tips, check these resources below:

Are you a designer looking for a better way to collaborate with clients?

With Atarim, you can leverage point-and-click collaboration to enable clients and stakeholders to point at what they’re referring to on any live web page, and immediately leave feedback, say what needs to be changed, and so much more. 

Plus, you can also create milestones, divide them into tasks, and monitor performance.

If you want to receive feedback that makes sense, make it easier to collaborate with clients, and finish projects in days instead of weeks, sign up to Atarim today – with paid plans from just $20 per month.

  • Integrated into the leading visual collaboration platform trusted by 13,000+ agencies (web dev, design, and beyond) worldwide.
  • Supporting project delivery for 1,200,000+ of their clients and stakeholders.
  • Deliver projects in days instead of weeks.

What Does a Project Manager Do?

Project management is all about making sure the project is completed on time and within the estimated budget.

It’s a job position for those who are looking to:

  • Manage team members
  • Conquer new challenges
  • Take calculated risks 

It can be very stressful, but the reward is definitely worth it! After all, you’re the one responsible for the project’s success.

In this post, you’ll discover everything about project management and how to get into it.

A Quick Primer on Project Managers

A project manager is a professional that organizes, plans, and executes projects while making sure everything is on time and within budget. These professionals lead teams, evaluate projects, and make decisions on the go.

Project management structure

Source: Indeed

After all, they’re the ones who are responsible for the project’s success or failure. 

The Roles & Responsibilities of a Project Manager

Let’s take a look at some of the roles and responsibilities of project managers, so you know precisely what makes a great project manager – and what skills and training you should be looking for.

Task Management

You are probably already familiar with using a project management software solution, such as Asana, Trello, or Atarim. 

And while you may get along with these tools just fine (since you probably use them daily), you’ll most likely need to get at least some sort of understanding of the more advanced/admin features.

This is because your job will usually involve assessing the project and dividing it into smaller milestones.

creating milestones in Atarim

You will then have to dig a bit deeper and divide each milestone into tasks for the team.

creating tasks in Atarim

This requires careful planning, proper resource management, and the ability to choose the right team members and manage them – so that everything is on track.

Team Leadership

You’ll often find that the initial plan will vary from how the project actually progresses.

If that happens, it’s your responsibility to step in, make the necessary adjustments, and take a leadership role in the team. You have to be able to understand what’s happening – and find a way to fix it.

Team leadership also involves giving clear direction and guidance to the project team and motivating your team members. After all, the friendlier and better working environment you can create, the better the results of the projects.

a friendly work enviroment can motivate employees

Atarim lets you manage your team better with internal tasks.

Internal tasks act as clear directions and guidance to your team members – your clients won’t be able to see them.

atarim internal tasks

This enables you to provide team members with all the information they need without overwhelming the external stakeholders. This is also useful if you don’t want to share all tasks with the stakeholders.

Because these internal tasks can be left as visual notes directly on the web page, your team members will know exactly what to do, and be able to dive straight in and carry out the necessary work. This makes communication and the delegation of tasks so much easier for you, as project manager.

Risk Management

Risk management is all about identifying risks and dealing with them.

For instance, in a graphic design project, you might identify that the client’s requested revisions could heavily affect the project timeline.

After identifying the potential risks, you’ll need to assess their impact and likelihood. The next step is to find a way to mitigate these risks or overcome them. 

For instance, in the design example above, you could schedule regular check-ins and communicate clearly with the stakeholders. This would let your team make the changes as you work on the project – instead of when it’s done.

This could help eliminate any delays and speed up the workflow. Of course, this requires careful planning, and high adaptability.

Stakeholder Communication

You’ll also have to be able to effectively communicate with the stakeholders.

This requires active listening, clear communication, and also both interpreting what the stakeholders said to your team, and making the necessary adjustments. You’re also the one providing reports and expectations of the project to them.

If you can properly communicate with your stakeholders, you’ll be able to encourage them to leave feedback in a timely manner, so you can adjust the project accordingly.

?We understood the issue with feedback and communication on visual projects – and that’s why we created Atarim!

Atarim enables either the client or anyone on your team to leave visual feedback or suggestions on the live website you’re working on – instead of sending confusing emails back and forth, and relying on guesswork. 

This streamlines the communication and avoids confusion.

Learn more about how Atarim helps maximize productivity.

Budget and Resource Management

Budget and resource management is one of the key roles of project managers. This requires careful estimation and planning, adjustments, and plenty of experience.

Although it’s one of the hardest skills to master, it’s also one of the most important. If you can show others that your projects are on time and to budget, they’ll most likely choose you over most project managers.

Developing the Skills for Success

You’ve learned the roles and responsibilities of project managers and the way they work.

But how do you actually develop the skills you need – or improve them for that matter? That’s what you’ll learn in this section.

Communication & Leadership Skills

Communication and leadership skills are some of the most important skills for successful project management.

In fact, businesses that communicate effectively are able to achieve:

These skills are something you have to develop over years. 

But there are useful tips or areas of communication and leadership to look into, such as:

  • Active listening. Focus on fully understanding what others are saying before formulating a response. 
  • Clear and concise communication. Practice articulating ideas clearly and directly.
  • Feedback and constructive criticism. Provide and receive feedback in a constructive manner.
  • Lead by Example. Demonstrate the behaviors and attitudes you expect from the team members. This sets a standard for communication and leadership.

Problem-Solving and Critical Thinking

Critical thinking is finding and understanding facts to make a decision.

It’s about getting the emotions out of the way and focusing on what’s really happening – seeing the situations objectively.

what is critical thinking

Source: Tscfm

Problem-solving is vital too.

It’s the ability to solve problems that occur within your projects – and trust us, there will be plenty of problems to solve!

To help you be better at both of these skills, we recommend that you practice:

  • Scenario-based exercises. Engage in problem-solving exercises that mimic real-world situations. This sharpens your ability to think critically under pressure. 
  • Root Cause Analysis. Practice identifying the causes of problems rather than just addressing surface-level symptoms. 
  • Brainstorming. Foster a creative environment where team members can freely share ideas to solve challenges. 

Adaptability and Flexibility

Most projects don’t go as planned – in fact only 64% of all projects meet their objectives.

That’s why you’ll need to constantly shift priorities, make the necessary adjustments, and be extremely flexible and adaptable to the situations that occur. The best way to learn this is with experience.

However, careful planning and risk management, which includes assessing every scenario that may occur and preparing for it, can be a massive help.

Here are a few tips you can follow to be more flexible as a project manager.

  • Embrace change. Approach changes with a positive attitude and a willingness to adapt. See them as opportunities for growth and improvement. 
  • Scenario planning. Develop contingency plans for potential changes or unforeseen events. This prepares you to respond effectively in dynamic situations. 
  • Time management and prioritization. Build the ability to quickly adjust priorities and allocate resources based on changing circumstances. 

Quick Tip: Don’t forget to take a closer look at past projects, learn from them, and apply what you learned into the new ones.

Emotional Intelligence

58% of job success is attributed to emotional intelligence – across all jobs!

Emotional intelligence is what will help you understand how your team members feel and what motivates them. This empowers you to keep everyone happy and feeling good.

(This massively promotes job satisfaction and productivity.)

You can take an emotional intelligence test to see how you stack up against others.

If you’re looking to sharpen your emotional intelligence, be emphatic, and maximize the success rate of projects, we recommend looking into:

  • Self-awareness. Practice understanding your emotions, triggers, and tendencies. 
  • Empathy. Learn to understand and relate to the emotions of others. This helps build strong relationships and fosters a positive team dynamic.
  • Regulation of emotions. Learn to manage and express emotions in a healthy and constructive manner.
  • Recognizing emotions in others: Sharpen your ability to perceive the emotions of others, even when they have a difficult time showing them.

How Much Do Project Managers Make?

The average salary of a project manager in the US was $95,370 annually in 2022.

Of course, this is only the average – you can make well over $150,000 or more, especially if you’re qualified and experienced.

To maximize your chances of getting higher pay, we recommend:

  • Choosing the right niche. Some niches are more profitable than others. The most profitable niches are design, IT, construction, and healthcare.
  • Getting educated. Online courses or professional training can often help you sharpen your skills and lead to higher pay.
  • Getting certified. Certifications act as a proof of your skills and can validate your abilities to the employer.

Conclusion – Ready to Start Your Project Management Journey?

Project management is high in demand since it plays a pivotal role in ensuring projects are successful and delivered on time.

If this sounds like a job position for you, you might find these resources useful:

Looking for an effective way to manage projects?

With Atarim, you can leverage point-and-click collaboration to enable clients and stakeholders to point at what they’re referring to on any live web page, and immediately leave feedback, say what needs to be changed, and so much more. 

Plus, you can also create milestones, divide them into tasks, and monitor performance.

If you want to receive feedback that makes sense, make it easier to collaborate with clients, and finish projects in days instead of weeks, sign up to Atarim today – with paid plans from just $20 per month.

  • Integrated into the leading visual collaboration platform trusted by 13,000+ agencies (web dev, design, and beyond) worldwide.
  • Supporting project delivery for 1,200,000+ of their clients and stakeholders.
  • Deliver projects in days instead of weeks.

8 Signs You’re Becoming a Micromanager (And How to Fix It)

Of all the managers and individual contributors I’ve met on teams, I’ve never met a single one who truly enjoys micromanagement.

Some managers may view it as a necessary evil for certain teams and types of employees, but is it realistically a good practice? And how can you tell when you’re starting to micromanage someone on your team?

We’ll cover all that & more in this guide.

In fact, 68% of employees said it had decreased their morale, and 55% claimed it had hurt their productivity – which is something you can’t afford!

Although micromanagement may not feel as though it’s a common problem, it affects 59% of employees.

micromanagement funny example

Source: Jeff Skipper Consulting

If you’re a manager, your number one priority should be to create a friendly atmosphere in which your team can thrive and develop.

So, are you a micromanager or not?

How can you tell?

In this post, we’ll share the most common signs of micromanagers, so you identify whether you’re actually a micromanager… or tending towards that kind of behavior – and if you are, you’ll learn how to fix it! ✅

A Quick Primer on Micromanagement

Micromanagement is a style of leadership characterized by excessive control and a tendency to be overly involved in the details of tasks.

It isn’t healthy for anyone – and only hurts job satisfaction!

micromanaging overview

Source: Helpful Professor 

It’s also one of the most common reasons why there are high turnover rates with employees, poor performance, and lack of motivation.

7 Signs You’re Becoming a Micromanager

Get ready… it’s time to reflect on your management style!

Here are the most common signs of micromanagers we’ve observed in our 20+ years of experience working with hundreds of design companies.

Which characteristics feel dangerously familiar? ?

#1 – Excessive Involvement in the Work of Employees

An excessive involvement in the day-to-day tasks of your employees isn’t normal. 

It’s okay to be there for your team to help them when they need it. 

However, giving your team detailed instructions with no room for creativity, and checking on them multiple times a day is not a healthy style of management.

There are three main reasons why you might be doing this:

  • Lack of trust
  • A need for control
  • Maintaining a hands-on approach

Unfortunately, this signals a lack of confidence in your team members.

Plus, the constant oversight and controlling can prevent your employees from growing, developing their skills, and being productive.

How to Fix It

If this sounds like you, you might be hurting the team’s productivity and satisfaction.

Fortunately, there are still ways you can overcome this, gain trust in your employees, and achieve better results with your team:

  • Delegate effectively. Trust your team members with responsibilities that match their skills. Communicate expectations and give them the freedom to complete the tasks.
  • Provide training and resources. Ensure your team has the training to accomplish their tasks. This helps to build confidence and competence within the team.
  • Encourage open communication. Foster a culture of open communication where team members feel comfortable sharing their progress, challenges, and ideas.

#2 – Focusing Only on Details, Not the Bigger Picture

It’s very easy to get so involved in a task that you forget about the bigger picture and focus on smaller, less meaningful details. 

Unfortunately, this isn’t optimal for either your agency or your team members.

  • For your agency, this means it will be very difficult for it to grow and take on new opportunities, because you’re so caught up in details.
  • For your team members, this means you don’t give them creative freedom and an opportunity to grow and figure out the journey to get to the results needed.

So, it’s not optimal for anyone!

How to Fix It

Being able to see the bigger picture and leaving your team with creative freedom is vital for the long-term growth of both the agency and the individuals working as part of it.

Here are a few tips that can help you shift your focus in the right direction:

  • Encourage decision-making. Let team members make decisions within their roles. Let them take ownership of work, make choices, and learn.
    Focus on results, not methods. Shift the focus from dictating methods to emphasizing the desired results. Give flexibility to team members in choosing the ‘how’ part of a task.
  • Set boundaries. Resist the urge to intervene in every detail, giving team members the space to work freely.

#3 – High Turnover Rates

Having high turnover rates with employees can be a sign of micromanagement.

If employees are unsatisfied with their working environment, expectations, or leadership in general, they will leave.

  • Inadequate work-life balance. A consistently high workload, or long working hours without appropriate balance can lead to burnout and turnover.
  • Mismatch of skills and job roles. If employees find their skills aren’t aligned with their role, they may leave for positions better suited to their abilities. 
  • Ineffective onboarding and training. A lack of proper onboarding can make employees feel unprepared and unsupported, leading to turnover.

Of course, high turnover rates can be caused by other reasons, too.

For instance, your employees might not see a clear career path, or they may be looking for higher flexibility, benefits, and pay.

But, it might well be a sign of micromanagement, so take that into a consideration!

How to Fix It

High turnover rate isn’t a good look for your agency. Here are a few ways to fix it:

  • Encourage Open Communication. Foster an environment where open communication is valued. Make the time to listen to the team’s concerns.
    Set Clear Expectations. Ensure that expectations for tasks and projects are communicated clearly from the beginning. Clarify roles, responsibilities, and project objectives.
  • Recognition and Appreciation. Implement recognition programs to acknowledge and appreciate employees for their hard work and contributions.

#4 – Failure to Provide Feedback

Failing to provide feedback when your team needs it, and instead handling the situation on your own, is another tell of micromanagement. This lack of feedback can prevent your team from improving, and preventing the same mistakes in the future. 

There are a few reasons why you may be doing this:

  • Time constraints. Busy schedules and heavy workloads may cause you to prioritize other tasks over providing feedback.
  • Avoidance of conflict. Some managers may fear that delivering constructive feedback could lead to conflict or discomfort, so they avoid providing it altogether.
  • Lack of communication skills. You may not have the communication skills to deliver feedback in a constructive and supportive manner.

Either way, none of these are great for the long-term success of your agency.

Although sometimes you need to jump in and do the work to prevent tasks from being delayed, this should not be a regular occurance. And even if you do decide to get things done by yourself, you should always go back and make time to provide constructive feedback.

That’s the only way you and your team can grow!

How to Fix It

To fix this, you first need to understand the reason why it happens. Here are a few tips that can help you provide feedback instead of handling everything yourself:

  • Establish a feedback culture. Foster a culture in which feedback is seen as a regular and essential part of professional development. 
  • Regular check-ins. Encourage regular one-on-one check-ins. This provides opportunities for feedback and ensures that communication is on point.
  • Provide training for managers. Get training on effective communication and providing feedback.

#5 – Unwillingness to Delegate

Having full control over everything at all times can be a sign of a lack of trust in your team.

Unfortunately, not being able to rely on your team, and being a control freak isn’t an optimal way to handle things.

Here’s why you may worry about assigning tasks to your members, rather than doing them yourself:

  • Perceived lack of trust. You may struggle to trust team members to handle responsibilities independently.
  • Fear of losing control. You may fear losing control over the outcome of tasks or projects if you delegate, especially if you’re a perfectionist.
  • Desire for personal recognition. You may prefer to complete tasks yourself to receive recognition for the effort, rather than sharing credit with the team.

You may also struggle with communication skills or have insecurities of someone performing tasks better than you – this isn’t pleasant for you either.

You should instead view it as an opportunity to grow and improve.

How to Fix It

Building a solid trust with your team is the first step to overcome this fear. Here are a few things that may help you fix it:

  • Trust-building activities. Organize trust-building activities and workshops to foster stronger relationships within the team.
  • Communication training. Get training in effective communication to clearly articulate expectations and provide the necessary guidance when delegating tasks.

#6 – Constantly Checking In

Having regular check-ins is important – but don’t go overboard with them.

It’s one thing to make sure everything is on time, but quite another to be excessively involved in small details that your team can handle perfectly well.

  • Fear of uncertainty. You may be uncomfortable with uncertainty and want to ensure everything is on track by checking in frequently.
  • Perfectionism. As a perfectionist, you may have a desire for control over every detail.
  • Communication style. Some communication styles involve frequent updates as a way to stay informed, but this can lead to excessive checking in.

Also, constantly checking on team members interrupts their work, increases pressure, and leads to lower job satisfaction.

How to Fix It

Here are a few tips to cope with the need for constantly checking in:

  • Establish clear communication channels. Set clear communication channels and expectations for updates. Set regular check-in times if needed.
  • Encourage proactive updates. Encourage team members to provide proactive updates on significant milestones or challenges.
  • Define key metrics. Clearly define key performance indicators (KPIs) and metrics that managers can use to track progress.

#7 – Rarely Satisfied With Deliverables

Always feeling unsatisfied with the work of your employees is a huge problem. It’s essential you identify the cause for it. It’s usually either that you have too high expectations or your team is unqualified.

Here are a few other reasons why it might be happening:

  • Lack of clarity in expectations. If expectations and requirements are not communicated clearly, you may consistently feel that deliverables fall short.
  • Constantly raising the bar. You may feel you want to continually raise expectations without acknowledging and appreciating the efforts.
  • External pressures. Maybe you’re facing pressure from external stakeholders and may pass on that pressure to the team.

Unfortunately, this isn’t creating a healthy atmosphere in your organization.

Your team members may feel a lack of confidence, higher stress, and lower motivation – which usually results in even worse performance.

How to Fix It

Here are a few ways that will help you address (and hopefully fix) this:

  • Clear communication of expectations. Discuss and document requirements, standards, and any important information before you start the project.
  • Establish realistic standards. Work with the team to establish realistic standards by considering resources, timelines, and constraints.
  • Acknowledge and appreciate efforts. Positive reinforcement can motivate your team and enhance job satisfaction – which will greatly increase productivity!

#8 – Suggest Unrealistic Expectations & Deadlines

It’s one thing to push your team, but quite another to have unrealistic expectations from them.

That’s why you should be clear on the expectations with your team members before you start the project – and get feedback from them on whether they can manage it.

  • Lack of understanding. You may not fully understand the complexity required for certain tasks, leading to unrealistic expectations.
  • Pressure from higher-ups. You may face pressure from upper management to deliver results quickly.
  • Overestimation of team capacity. You might assume you can accomplish more in a given timeframe than is realistically possible.

Ideally, you want to be proactive with expectations and deadlines.

Oftentimes, even if your team can’t manage the workload, they won’t say anything – they’ll persuade themselves that they’ll somehow get it done.

How to Fix It

We definitely recommend educating your team on time management, if your goal is to increase productivity.

But, here are additional tips to help you and your team get aligned with the expectations:

  • Collaborative goal-setting. Collaboratively set expectations and deadlines, taking into account the team’s input and expertise.
  • Regularly assess workloads. Regularly assess team workloads and adjust expectations as needed. 
  • Negotiate realistic timelines. Clearly communicate the potential risks and consequences of setting unachievable deadlines.

Conclusion – Are You Becoming a Micromanager?

Micromanagers are a pain to work with – constantly checking in, having no trust in their team, and setting unrealistic expectations.

Hopefully you’re not one of them!

To learn more tips about team and project management, check these resources below:

Looking for an effective way to manage projects?

With Atarim, you can leverage point-and-click collaboration to enable clients and stakeholders to point at what they’re referring to on any live web page, and immediately leave feedback, say what needs to be changed, and so much more. 

Plus, you can also create milestones, divide them into tasks, and monitor performance.

If you want to receive feedback that makes sense, make it easier to collaborate with clients, and finish projects in days instead of weeks, sign up to Atarim today – with paid plans from just $20 per month.

  • Integrated into the leading visual collaboration platform trusted by 13,000+ agencies (web dev, design, and beyond) worldwide.
  • Supporting project delivery for 1,200,000+ of their clients and stakeholders.
  • Deliver projects in days instead of weeks.

The 8 Best Web Design Blogs To Follow In 2024

Inspiration? Meh. Sometimes we all get days when we convince ourselves we have the creativity of a teaspoon.

A beige teaspoon.

It can sometimes be very difficult to create a new design for either yourself or your clients.

We’ve been in your shoes (and worn the laces out, stepped in a few puddles, and lost one temporarily), and that’s why we’ve handpicked some of the best design blogs on the Internet!

These will help you get the spark of inspiration you need to create great designs you and your clients will be truly delighted with.

Plus, following these blog recommendations also ensures you stay on top of design trends.

In this post, we’ll share some of our best design blog recommendations you should follow to stay on top of your design game and continue creating killer designs.

And if the spark of inspiration flickers into life, keep the shoes away. Especially if they’re flip-flops.

Let’s get started!

#1: Atarim

Yes, that’s us. Although we might be a bit biased, we believe that you’ll find tons of value and useful information about web design and managing a web design agency on our blog.

Our blog is divided into multiple categories for better organization, including:

  • Design
  • Freelancing
  • Running an agency
  • WordPress
  • Productivity

We base each of our blog posts on our experience and on real-life data, so you can be sure that the advice we give you works.

The blog posts are very easy to read, and feature tons of useful images and practical examples.

We often talk about our experiences with clients, or mistakes we’ve made, so you can learn from them and prevent them from happening to you. Aside from guides, we also provide summaries of events and interviews with industry-leading experts. 

Of course, we also have our own visual collaboration tool – the Atarim app.

The Atarim app will help you manage your design work and team better, eliminate back and forth emails, and empower you to work with clients visually.

Paid plans start from just $20 a month, but with Atarim helping you cut delivery times down by 70%, you’ll be saving much more than the price, many times over.

Plus, you can also hop on our weekly newsletter to learn more about design trends, client communication, and everything Atarim-related.

#2: Smashing Magazine

Smashing Magazine is a well-known web design blog that covers every topic around great design, such as web design, accessibility, and usability.

Their blog is nicely organized, so you can instantly jump to what you’re looking for.

Each of their blog posts is very easy to read, and features plenty of before-after examples, so you immediately know how to apply what you’ve learned.

At the end of each post, you’ll find useful resources, tools, and examples.

Aside from blog posts, they also offer books and ebooks, workshops, and a community you can join. If you’re looking for design jobs, Smashing Magazine won’t let you down.

They have their own job board where you can either get hired yourself, or hire the designers you need.

And in case you’re looking to stay on top of design trends, you can opt in for their weekly newsletter, which is completely FREE.

#3: Dribbble

Dribbble is a reputable design blog that offers a one-stop shop for anyone looking for the newest design tips, tricks, and trends. This blog is especially useful for inspiration since they feature thousands of great design examples for every type of design.

Their blog is divided into categories, so you can easily find what you’re looking for.

Each of their blog posts is written by industry-leading experts, with tons of examples, statistics, and real-life data – so it’s not only appealing, but also usable.

Aside from blog posts and guides, you can also find other types of content, such as:

  • Interviews
  • Podcasts
  • Design event summaries

Dribbble also has one of the biggest online job boards for those either looking for design jobs, or hiring.

It’s a very social place too, with a community of 10M+ members, where you can share your design, get a design critique, or engage with new clients, collaborators, and future employers. You can join their community for FREE or pay $8/month for priority visibility.

#4: Behance 

Behance is a design blog from Adobe that offers design updates and inspiration.

Their blog offers a wide variety of design inspiration, although it’s more geared toward connecting professionals together and buying designs from their platform. 

(If you’re looking for guides, tips, or tricks, this isn’t a blog for you.)

They have an active job board with 10,000+ designers and 262+ jobs, with new job postings every day.

You can also buy design assets from Behance, currently with 10k+ designs for sale. This includes everything from fonts and templates to vectors. You can use their filters to find what you’re looking for, or use their search bar at the top.

What’s great about their design inspiration is that you can select a few designs you like and Behance will automatically personalize your design inspiration feed for you.

#5: Design Milk

Design Milk is a blog for designers that features a curated selection of the best design work from around the web. 

We found this blog especially useful for architecture and interior design ideas. 

However, they cover design guides and web design inspiration. They’ve got a great blog structure, featuring 25+ different blog categories. Each of their blog posts is very in-depth, including plenty of images.

Design Milk also has a YouTube channel if you prefer to watch videos rather than read blog posts. You can find 343+ videos revolving around design inspiration, interviews with industry experts, and design tips.

Plus, if you’re looking for the latest design trends and news, you can also sign up for their email newsletter.

#6: Abduzeedo

Abduzeedo is a blog that covers a wide range of topics, from UI and UX design to branding and typography. 

You can also find interviews with leading designers on their website. Plus, they have very in-depth tutorials too.

For instance, one of their latest tutorials is about building an Abduzeedo app, and outlines a step-by-step process of building it from the very beginning. You can also find this tutorial in video form in the Conclusion part (or on their YouTube channel).

Abduzeedo’s blog posts are very easy to follow, and feature many images and examples.

Unfortunately, we found the organization of these tutorials isn’t the best. 

It can be challenging to find the tutorial you’re looking for, since each of their tutorials has only a featured image in the blog list – there is no headline or description whatsoever.

You will also often encounter annoying ads, which you can get rid of by becoming a paid reader – starting at $3.99 a month.

#7: CSS Tricks

CSS Tricks is an excellent platform for web design blogs and web development trends.

This blog is specifically for web designers, featuring the newest web design trends, guides, and fixes on common HTML/CSS/JS issues.

Aside from design articles, you can also get very useful blog posts about:

  • Website security
  • Website accessibility
  • Learning coding languages

Each of their blog posts features step-by-step instructions, examples, and code snippets you can copy and paste to your website. It’s a MUST-READ for every web designer, no matter whether you’re a beginner or an experienced veteran.

You’ll also find an almanac and a web design forum on their website. 

This forum is great – especially when you encounter issues with your web design. You can ask the community to help fix everything web design related very easily. 

In case you’re looking for videos, CSS Tricks have 211+ videos on their website. You can also find videos on their YouTube channel.

They also run a newsletter, which you can opt in for, or find on their website.

#8: Design Week

Design Week is one of the leading design magazines around the globe.

Their blog features topics as diverse as design news, graphics, interiors, career advice, and inspiration for your design projects. They have an organized structure, so you can find everything immediately.

What’s unique about Design Week is their ‘Features’ posts. These include interesting topics such as a day in life of a designer, design industry trends, and interviews.

Design Week’s blog posts are easy to read, and written in the style of a magazine. It’s like reading a page from your favorite newspaper/news website. 

You can also sign up for their newsletter, where you can choose between three options:

  • Design Week daily newsletter
  • Design Week weekly newsletter
  • Communications from carefully selected organizations

Conclusion – What’s Your Favorite Design Blog?

There is no such thing as the best design blog – everyone prefers something different. But we truly believe that you’ll find your favorite design blog on today’s list.

To find out additional design-related tips and tricks, check out these resources:

Looking for an effective way to collaborate with clients directly on their website?

With Atarim, you can leverage point-and-click collaboration to enable clients to point at what they’re referring to on any live web page, and immediately leave feedback, say what needs to be changed, and so much more. 

If you want to receive feedback that makes sense, make it easier to collaborate with clients, and finish projects in days instead of weeks, sign up to Atarim today – with paid plans from just $20 per month.

  • Integrated into the leading visual collaboration platform trusted by 13,000+ agencies (web dev, design, and beyond) worldwide.
  • Supporting project delivery for 1,200,000+ of their clients and stakeholders.
  • Deliver projects in days instead of weeks.

Should You Let Clients Use Your Plugin Licenses? (Is It Even Allowed?)

You might be sharing a license with your clients, thinking that everything is fine. And while this could be the case, you could also be in direct violation of the software terms and conditions.

There are cases when it’s allowed, but also cases where it’s strictly forbidden in the terms agreement.

It’s essential to find whether you can let your clients use your plugin licenses before you get into any serious issues. We’ve been working with thousands of agencies and clients and we’ve experienced all scenarios with sharing licenses.

In this post, you’ll discover whether you should let clients use your plugin licenses – and how to stay out of trouble.

Can You Legally Share Licenses With a Client?

Every plugin is different and there is no definite answer, that’s why we always recommend checking the software’s terms and conditions.

In our experience, there’s nothing wrong with using your license with clients.

In fact, there are types of licenses that encourage you to do so, such as developer or agency licenses (more on the types of licenses later in the article). But, every plugin is different, so make sure you check each plugin’s specific licensing terms.

There are two scenarios which can happen when designing a website for a client. 

We’ll go over each of them, so you know how to act in each of these scenarios to avoid any potential issues with keeping to the terms of a license agreement. 

If Your Client Signs up For a Care Plan

This is the best possible scenario, and one which you should encourage your clients to pursue. This is because if you get a client on retainer with a care plan, you can increase your agency’s profits and provide them with the support and licenses they need.

There’s no issue with sharing your licenses with clients in this scenario since you’re the one managing the website and manipulating the themes or plugins you pay for.

If Your Client Does NOT Sign up For a Care Plan

In this scenario, you’re no longer involved with your client after the website has been completed and delivered – the website project is done and you go your separate ways.

In this scenario, there’s no reason to let them use the licenses that you pay/paid for.

Why Is It Beneficial To Pay For Clients’ Licenses?

You might also wonder why not just let your clients pay for everything – so you don’t have to check any license terms or go through this tedious process?

However, we definitely recommend you, as an agency, pay for licenses, and here’s why.

No Time Wasted On Delays

You want to finish projects as soon as possible, so you can move on to the next ones and keep the revenue flowing. The biggest ‘time waster’ is waiting for clients to respond to your message and requests – client-related causes of delay led to an average of 23% of time added to projects in 2022.

If you have to wait for your clients to pay for licenses, this can cause a huge delay in project completion.

Either they might not buy the license right away, or you might need to convince them that the license is really necessary and worth it. Not to mention if an issue occurs, it can take days or even weeks for a client to resolve it.

Easier To Get Clients Into Maintenance Plans

If you pay for the licenses yourself, it’s certainly in the client’s interest to opt for a maintenance plan. 

This is because you, as an agency, usually have either a lifetime or developer license, so you don’t have to pay for each client’s license separately – you just pay a fixed fee. This means clients can benefit from the additional software, features, or services at no additional cost, increasing the value for money of a maintenance plan.

If a client needs to pay $500 for all of the licenses (and possibly on an annual basis), it’s wiser to just hop on your maintenance plan for $600 where they can benefit directly from the licenses, but also your support.

Developer or Lifetime Licenses for Premium Plugins?

As mentioned earlier, lifetime or developer licenses usually let you work on an unlimited number of projects. This means that instead of 5 clients paying $500 each, you can achieve the same result by paying just $1000 in total.

That’s a huge difference, and can be a compelling reason for clients to work with you (since you can offer your services at a much better price than could be achieved even partially in-house).

What If You Unboard A Client?

You might be wondering what if you part ways with a client – should you remove the licenses (and the plugins/themes possibly), and what will happen to their website then?

We’ve experienced three scenarios with licenses when unboarding clients.

You Completely Stop Working With Them

If you part ways with your client after the project has been completed, we recommend manually removing a license before handover. You don’t have to worry about their website no longer being functional.

The most likely outcome is that they won’t receive updates for the plugin/theme/tool.

Another way you can handle this situation is to be upfront with a client and let them know beforehand that you’ll be removing their license.

This is an approach that Adam Silver, WordPress trainer and educator, recommends.

  • “When I offer ongoing support, I include the use of my dev tools. If that biz relationship ends, then they have 30 days to replace.” 

Although unlikely, it is possible that in this scenario, there might be a situation where a client will try to prevent you from removing the license. For instance, they might revoke your access to their website before you have any chance to remove a license.

If this happens, we definitely recommend contacting the company providing your license straight away to explain the issue.

You Can Put Them On a Care Plan

This is a scenario we mentioned earlier in the article.

If a client wishes to part ways with you, then it makes sense to suggest that they switch to a maintenance plan, and to explain the benefits. This can be as simple as pointing out that they would be paying the same or a similar amount for a license alone, compared with if they benefited from your agency’s licenses, and got a full maintenance plan included.

You Pay For the Licenses & Pass the Cost + Percentage to the Client 

In some cases, there won’t be a developer or lifetime license option, and either you or your client will have to pay for the license used on the client’s site. If this is the case, you can pay for the license yourself, and then include the cost of the license in the final invoice.

Many clients don’t want to be burdened with paying for multiple licenses, and would much rather pay one invoice from you – as it’s more convenient, even if it means that they’ll be paying slightly more than it would if they did it themselves.

The Best Licenses for Agencies

There are often many different types of license offered by developers of plugins, themes, and page builder tools. Some of these types of licenses tend to be more useful than others – especially for agencies.

Any of the following types of license are especially useful for web agencies.

Multisite License

A multisite license allows you to use the licensed tool on multiple websites at the same time. When choosing this type of license, you should consider:

  • The usage limit. There’s often a limit on the number of websites you can use the product on.
  • Cost-effectiveness. Multisite licenses can be more cost-effective than purchasing separate licenses for each domain.
  • Updates and support. Multisite licenses typically include access to updates and support for all the licensed domains. But you should always verify this, since each product can be different.
multisite license example

Of course, some tools can also offer unlimited licenses, so there is no usage limit. This is definitely more beneficial.

Developer License

Developer licenses are designed for developers, agencies, or anyone who creates websites or applications for clients. This license type allows you to use a tool, theme, or plugin on multiple client projects. 

developer license example

When using this type of license, it’s critical you read the specified license terms.

Many developer licenses are non-transferable, so the license holder is the only one allowed to use the product for client projects. Clients themselves would need their own licenses if they wanted to use the product on their own site. 

Lifetime Access License

Lifetime access licenses grant you full access to the tool, theme, or plugin. You usually have to pay a one-time fee, which then allows you to use the tool, theme, or plugin with minimal restrictions, including:

  • Unlimited usage duration
  • No renewals required
  • No usage limit

However, not all lifetime access licenses are transferable, in which case, the license holder is the only one allowed to use the product. Also, while lifetime access licenses provide the holder with indefinite access, they may not grant the right to redistribute the tools.

lifetime license example

Conclusion – Are You Using Your Licenses With Clients Correctly?

Sharing licenses with clients doesn’t have to be restricted. However, it’s always a good idea to check the terms and conditions of each tool you use.

To learn more tips and tricks for your agency and clients, check out these resources:

Looking for an effective way to collaborate with clients directly on their website?

With Atarim, you can leverage point-and-click collaboration to enable clients to point at what they’re referring to on any live web page, and immediately leave feedback, say what needs to be changed, and so much more. 

If you want to receive feedback that makes sense, make it easier to collaborate with clients, and finish projects in days instead of weeks, sign up to Atarim today – with paid plans from just $20 per month.

  • Integrated into the leading visual collaboration platform trusted by 13,000+ agencies (web dev, design, and beyond) worldwide.
  • Supporting project delivery for 1,200,000+ of their clients and stakeholders.
  • Deliver projects in days instead of weeks.

The 3 Scrum Artifacts and How They Can Help You

Teams employing Scrum deliver a remarkable 250% improvement in quality.

If you’re looking to finish projects faster, make your team more productive, and deliver better results to your clients, Scrum is one of the best frameworks to use. There are many ways you can go about using Scrum with your projects.

We’ve divided this complex framework into three simple steps to help eliminate confusion and allow you to get started using Scrum with ease.

In this post, you’ll discover the three Scrum artifacts and how they can help you manage projects better.

What Are Scrum Artifacts?

Scrum artifacts help teams organize their work, track progress, and ensure everyone is on the same page – reducing any delays or friction. These artifacts act as a roadmap that guides the team through the project completion.

There are three main artifacts in the Scrum framework:

  1. Product backlog. This acts as a to-do list for the project, containing all of the tasks, features, and improvements.
  2. Sprint backlog. This acts as a short-term plan, containing the tasks with assigned team members, urgency, and deadlines.
  3. Product increment. This is the result of the work done during a sprint – it’s a working version of the product (or may even be a final version).
Scrum artifacts

Source: Atlassian

The Three Main Scrum Artifacts

Now we’ve covered an overview of the Scrum framework and its artifacts, let’s examine a number of useful tips and real-time examples, so that you can begin using it in your framework with your team, maximizing your productivity. 

We’ll be using the Atarim app through this process.

#1: Product Backlog

The product backlog is a to-do list that includes everything needed to finish a product, such as:

  • Improvements
  • New features
  • Bug fixes
  • Tasks

This ‘to-do’ list is usually put together by using data from customer support, competitor analysis, market demands and business analysis.

The product backlog needs to be very dynamic, with new tasks added on-demand from clients. Of course, the number of potential changes to a product can be limitless. The only limitation is the capacity of your team to deliver them. Therefore we like to think of it as a space for coordinating workload that is manageable.

Here’s how a product backlog would look for designing a website for a small business.

Let’s say you and your team need to create a website for a local bakery. To manage the project effectively, you decide to use a product backlog. You’d start by gathering data and adding that into the backlog.

Gathering Design Ideas

You and your team meet to brainstorm design ideas for the bakery website. 

This includes things such as choosing a color scheme, selecting fonts, creating a logo, and designing layout mockups.

brainstorming

Source: Hover

Plus, with each of the ideas you gather, you’ll also think about how it will impact the UX. 

It’s all about getting into your ideal customer’s mindset and thinking about their interests and what appeals to them – “as a visitor, I want the website to have a warm and inviting color scheme so that it feels friendly and welcoming.”

Prioritizing

You’ll now need to discuss which design elements are the most important.

For instance, you might all agree that creating a wireframe, a website template, a color scheme, and branding are the most important.

Atarim product backlog

Estimating Effort

Now you estimate how much time and effort each task requires. 

Designing the logo might be labeled as “medium” effort since it involves creativity and iterations. Choosing the color scheme could be seen as “low” effort because it’s about making aesthetic choices and is generally a lot faster.

Atarim time estimation

Adding and Refining

As the project progresses, new ideas will arise, or there may be a need to refine existing tasks. 

For instance, you might add “Creating iconography for the website” and “Testing color contrast for accessibility.” This is a continuous process that lasts through the whole process of product development.

Sprint backlog 

Sprint backlog includes the specific backlog items the Scrum team will deliver during the current sprint (specific time period of product development). It involves selecting a task from the product backlog and breaking that task into smaller, actionable sprint items.

Sprint backlog in Scrum

Source: Usefyi

For instance, you may have a task for “creating a shop page” in your product backlog.

However, this is a pretty big task that can be divided into smaller sub-tasks or steps, which can include:

  • Designing a product layout
  • Selecting product categories
  • Configuring product filters
  • Adding the ‘Add to Cart’ functionality
  • Setting prices and discounts

The product backlog contains this big task “creating a shop page”, while a sprint backlog divides this task into smaller, actionable tasks that will get completed more quickly and easily.

The smaller sprint tasks are assigned to the relevant teams such as design and development.

assgning tasks to team members in Atarim

Of course, the sprint backlog is also dynamic, similar to the product backlog, and is updated during the sprint planning phase of Scrum.

Here’s a progression of our bakery example from the product backlog into a sprint backlog.

Selecting Tasks for the Sprint

In your first sprint, you focus on crucial design elements.

Based on the priority from the product backlog, you select tasks such as “creating a wireframe”, “finding the right website template”, and “creating a color scheme”.

Atarim setting up task priority and urgency

The goal for this sprint is to have the foundational design elements ready for review.

Assigning Responsibilities

Each task is assigned to a team member based on their strengths and expertise. 

For instance, Mike is skilled in creating wireframes, and so takes on the task of creating a wireframe and choosing the template for the website.

Tracking Progress

There are plenty of ways you can track the progress of your current sprint. For instance, you can have regular, daily meetings with your team members to discuss what needs to be done, and get updates on the project progression.

We like to use the User Activity feature in the Atarim app for staying on top of things.

From there, you can see what each of your team members are doing, what tasks are overdue or are taking longer than expected, and make the necessary adjustments.

Atarim tracking team activity

#3: Product Increment

Product increment is the deliverables that your team completed during the sprint.

It consists of a usable and potentially releasable version of the product. In this step, you should also demonstrate the product to the stakeholders. In theory, no further development is required, and the product can be released immediately.

However, this is rarely the case, and you’ll often have to continue working on the project.

This may be due to the new tasks in product backlog, bug fixes, improvements, or feedback from a client. Product increments are additive – they build on previous iterations of the product.

By the end of several sprints, the Scrum team will have delivered multiple product increments (product versions), each improving on the next to meet user needs.

Let’s now continue with the example of designing a website for a local bakery.

Reviewing the Increment

If you do everything properly, you should meet the goal of your sprint. Now it’s time to review each of the deliverables and showcase them to the client.

  • Wireframe. The client sees a structured visual representation of how the website’s layout and elements will be organized.
  • Website template. This template includes the layout, navigation, and interactive elements, giving the owner a realistic preview of the website. 
  • Color scheme and branding. The finalized color scheme, along with the initial branding elements (such as fonts and visual styles).

Demonstrating Functionality

Next, your team ensures that the website and all deliverables are functional, such as making sure that links and buttons are interactive, providing a realistic representation of how users will interact with the website. 

Soliciting Feedback

The bakery owner reviews the Increment and provides feedback. 

They might suggest adjustments to the wireframe, provide preferences for some interactive elements, or offer additional feedback. 

Atarim leaving suggestions and feedback on client's live site

Now It’s Time to Repeat the Process

Based on the feedback from the client, you and your team can prepare for the next sprint.

The first sprint tends to be the hardest, since you’re creating a product from scratch. After you get the ball rolling, you can start to focus on easier tasks, such as:

  • Refining website template
  • Creating additional pages
  • Adding functionality

Each increment serves as a clear milestone in the project.

This project management philosophy allows for timely feedback, ensuring that the website design aligns with the bakery owner’s vision.

With each of the sprints, the product grows in value and functionality.

Conclusion – Ready to Start Your Scrum Project?

Scrum artifacts are essential steps for a successful project completion. If you’re looking to learn additional information about Scrum, we recommend checking our previous post on the best books for Scrum masters.

You can also learn more about managing projects by checking these resources:

Looking to make your team more organized and more productive? Atarim’s groundbreaking platform can help you:

  • Collaborate in real-time
  • Finish projects faster
  • Organize your work

One of the unique and revolutionary features of Atarim is that it has been built on the foundation of point-and-click collaboration – allowing clients to point at what they’re referring to on any live web page, and then immediately leave feedback, say what needs to be changed, etc. 

Agencies, developers, and project managers use Atarim to eliminate the need to rely on guesswork and endless back-and-forth email communication. 

If you want to receive feedback that makes sense, make it easier to collaborate with clients, and finish projects in days instead of weeks, sign up to Atarim today – with paid plans from just $20 per month.

  • Integrated into the leading visual collaboration platform trusted by 13,000+ agencies (web dev, design, and beyond) worldwide.
  • Supporting project delivery for 1,200,000+ of their clients and stakeholders.
  • Deliver projects in days instead of weeks.